整体架构篇
# 定义路由
# 安装
现在界面光秃秃的不好看,而且只有一页,我们先安装一下react router,老规矩,这是react router的文档 (opens new window),一定要多看文档,一定要多看文档,一定要多看文档,重要的事情说三遍。
npm install react-router-dom -S
# 定义路由
react router有两种路由,一种是HashRouter,另一种是BrowserRouter,其中HashRouter并不需要服务端做配置,而是路由中带一个#键,由前端来转发,所以我们选用HashRouter
- 在App.tsx中引入HashRouter,并让HashRouter包裹在最外层
// app.tsx
import { HashRouter } from "react-router-dom"

const App = () => {
  return (
    <HashRouter>
      App
    </HashRouter>
  )
}

export default App
2
3
4
5
6
7
8
9
10
11
12
新建views文件夹,定义login.tsx和home.tsx两个页面

新建routers文件夹,里面定义路由相关的东西,首先创建 index.tsx,我们使用
useRoute钩子
import {useRoutes} from "react-router-dom"

import Login from "@/views/login/index"
import Home from "@/views/home/index"

export const rootRouter = [
    {
        path:"/",
        element: <Home></Home>
    },
    {
        path:'/login',
        element: <Login></Login>
    }
]

const Router = () => {
    const routes = useRoutes(rootRouter)

    return routes
}

export default Router
2
3
4
5
6
7
8
9
10
11
12
13
14
15
16
17
18
19
20
21
22
23
- 在App.tsx中引入Router
import { HashRouter } from "react-router-dom"
import Router from "@/routers/index"

const App = () => {
  return (
    <HashRouter>
      <Router />
    </HashRouter>
  )
}

export default App
2
3
4
5
6
7
8
9
10
11
12
访问地址http://localhost:5000/,页面渲染出刚刚定义的home.tsx的内容
访问地址http://localhost:5000/#/login,页面渲染出刚刚定义的login.tsx的内容
# 安装antd
因为后面会用到antd中的一些组件,所以安装antd,antd官网 (opens new window)
npm install antd -S
然后在main.tsx中引入样式文件
import "antd/dist/reset.css"
后面需要使用antd组件的时候再按需加载即可
# 路由懒加载
随着页面越来越多,一次性加载所有页面资源非常的占用时间,有没有一种办法,可以只加载当然要访问的那个页面呢?
在react官方文档上其实给出了解决方案,React.Lazy (opens new window)
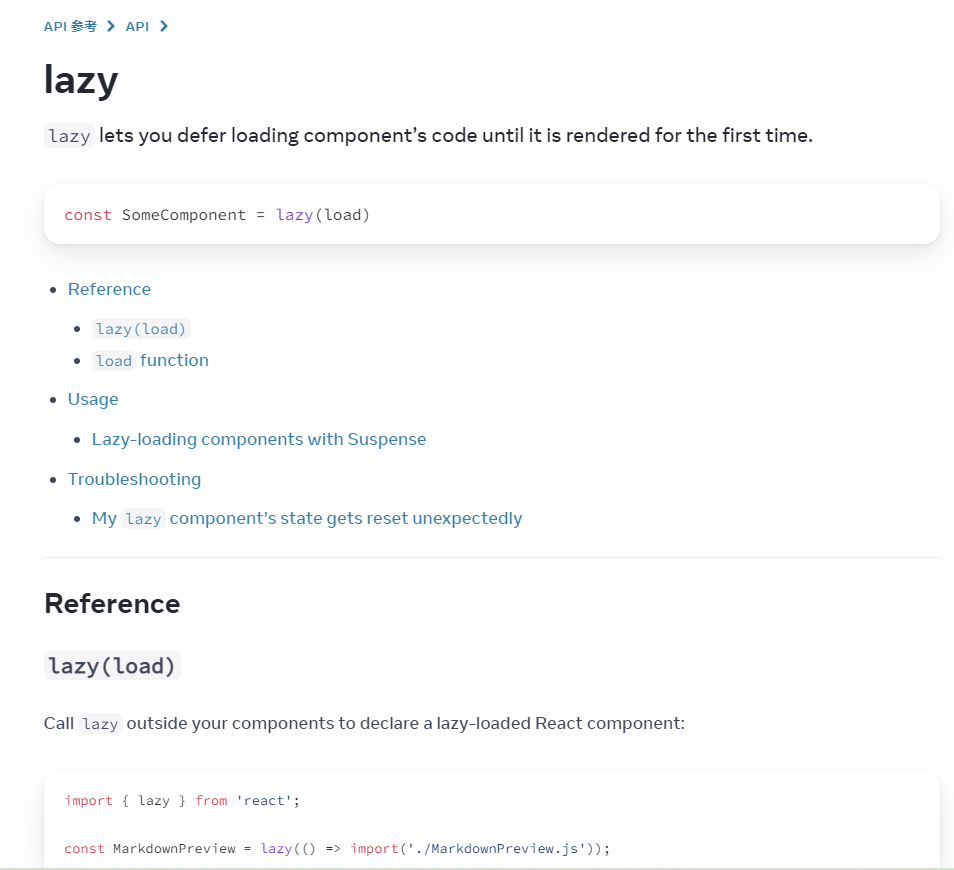 但是懒加载会花上一段时间,在这段时间内会有白屏的现象,可以将懒加载的组件用
Suspense标签包裹起来,Suspense的fallback属性是组件没有加载出来时显示的内容。
- 在routers下新建 utils/lazyLoad.tsx
- lazyLoad接收React.lazy()加载的组件,加载过程中显示antd的Spin组件
import React, { Suspense } from 'react';
import { Spin } from 'antd';

/**
 * @description 路由懒加载
 * @param 需要访问的组件
 * @returns
 */
const lazyLoad = (Comp:React.LazyExoticComponent<() => JSX.Element>) => {
  return (
    <>
      <Suspense fallback={
        <Spin
            size="large"
            style={{
                display: "flex",
                alignItems: "center",
                justifyContent: "center",
                height: "100%"
            }}
        />
      }>
        <Comp />
      </Suspense>
    </>
  );
}

export default lazyLoad
2
3
4
5
6
7
8
9
10
11
12
13
14
15
16
17
18
19
20
21
22
23
24
25
26
27
28
29
- 在router/index.tsx中将路由中加载的组件改写为懒加载方式
import {useRoutes} from "react-router-dom"
import lazyLoad from "./utils/lazyLoad"
import React from "react"

export const rootRouter = [
    {
        path:"/",
        element: lazyLoad(React.lazy(() => import("@/views/home")))
    },
    {
        path:'/login',
        element: lazyLoad(React.lazy(() => import("@/views/login")))
    }
]

const Router = () => {
    const routes = useRoutes(rootRouter)

    return routes
}

export default Router
2
3
4
5
6
7
8
9
10
11
12
13
14
15
16
17
18
19
20
21
22
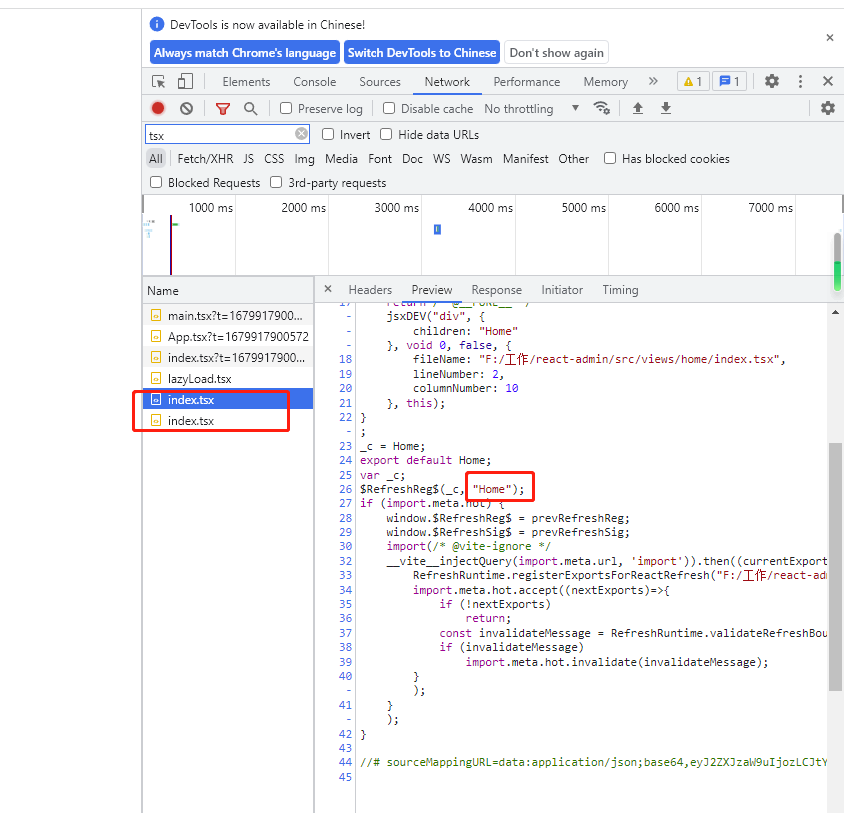
切换页面地址,可以看到对应组件被加载了
# 登录界面
登录界面比较简陋,简单用antd的Form组件写个登录界面
  // login.tsx
  import LoginForm from "./components/loginForm"
  import logo from "@/assets/images/react.svg"
  import "./index.less"

  const Login = () => {
      return (
          <div className="login-container">
              <div className="login-box">
                  <div className="login-form">
                      <div className="login-logo">
                          <img className="login-icon" src={logo} alt="logo" />
                          <span className="logo-text">My-React-Admin</span>
                      </div>
                      <LoginForm />
                  </div>
              </div>
          </div>
      )
  }

  export default Login
2
3
4
5
6
7
8
9
10
11
12
13
14
15
16
17
18
19
20
21
22
定义一下登录界面的ts类型, 登录界面表单一共有两个字段,username和passord,它们都是string类型:
// types/login.ts
//  * 登录
export namespace Login {
    export interface ReqLoginForm {
        username: string;
        password: string;
    }
}
2
3
4
5
6
7
8
  // login/components/loginForm.tsx
  import {Button, Form, Input} from "antd"
  import { UserOutlined, LockOutlined, CloseCircleOutlined } from "@ant-design/icons";
  import { useState } from "react";
  import { Login } from "@/types/login";

  const LoginForm = () => {
      const [loading, setLoading] = useState<boolean>(false)
      const [form] = Form.useForm()

      //login
      const onFinish = async (loginForm: Login.ReqLoginForm) => {
          console.log(loginForm)
      }

      const onFinishFailed = (errorInfo: any) => {
          console.log("Failed", errorInfo)
      }

      return (
          <Form
              form={form}
              name="basic"
              labelCol={{span:5}}
              initialValues={{remenber: true}}
              size="large"
              onFinish={onFinish}
        onFinishFailed={onFinishFailed}
              autoComplete="off"
          >
              <Form.Item name="username" rules={[{required:true, message:"请输入用户名"}]}>
                  <Input placeholder="用户名:admin/user" prefix={<UserOutlined />}/>
              </Form.Item>
              <Form.Item name="password" rules={[{required:true, message:'请输入密码'}]}>
                  <Input.Password autoComplete="new-password" placeholder="密码:123456" prefix={<LockOutlined />}/>
              </Form.Item>
              <Form.Item className="login-btn">
                  <Button
                      onClick={() => {
                          form.resetFields()
                      }}
                      icon={<CloseCircleOutlined />}
                  >
                      重置
                  </Button>
                  <Button type="primary" loading={loading} htmlType="submit" icon={<UserOutlined />}>登录</Button>
              </Form.Item>
          </Form>
      )
  }

  export default LoginForm
2
3
4
5
6
7
8
9
10
11
12
13
14
15
16
17
18
19
20
21
22
23
24
25
26
27
28
29
30
31
32
33
34
35
36
37
38
39
40
41
42
43
44
45
46
47
48
49
50
51
52
登录界面现在的样子如下:
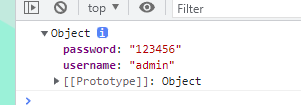
 输入用户名和密码点击登录,控制台会打印出刚刚的输入:
# 使用easy mock模拟登录接口
使用easy mock来造一个简单的登录接口,Easy Mock (opens new window),可以去看一下基本的使用方法,还是很简单的。 创建post方式的登录接口如下,其实就是自己写个假的
{
  code: function({
    _req,
    Mock
  }) {
    if ((_req.body.username == 'admin' || _req.body.username == 'user') && _req.body.password == 'e10adc3949ba59abbe56e057f20f883e') {
      return 200
    } else {
      return 500
    }
  },
  msg: function({
    _req,
    Mock
  }) {
    if ((_req.body.username == 'admin' || _req.body.username == 'user') && _req.body.password == 'e10adc3949ba59abbe56e057f20f883e') {
      return '登录成功'
    } else {
      return '密码错误'
    }
  },
  data: function({
    _req,
    Mock
  }) {
    if (_req.body.username == 'admin' && _req.body.password == 'e10adc3949ba59abbe56e057f20f883e') {
      return {
        access_token: "bqddxxwqmfncffacvbpkuxvwvqrhln"
      }
    } else if (_req.body.username == 'user' && _req.body.password == 'e10adc3949ba59abbe56e057f20f883e') {
      return {
        access_token: "unufvdotdqxuzfbdygovfmsbftlvbn"
      }
    } else {
      return null
    }
  }
}
2
3
4
5
6
7
8
9
10
11
12
13
14
15
16
17
18
19
20
21
22
23
24
25
26
27
28
29
30
31
32
33
34
35
36
37
38
# 使用redux
Redux (opens new window)是应用的状态管理容器,对标vue的vuex,redux官方推荐使用redux toolkit,先安装一下:
npm install @reduxjs/toolkit react-redux -S
# store设计
redux toolkit 可以使用 createSlice 来创建store的切片,然后通过combineReducers再将它们组装起来。 先创建一个切片专门存放token和用户信息。
// redux/modules/global.ts
 import { GlobalState } from "@/types/redux";
 import { createSlice } from "@reduxjs/toolkit"

 const globalState: GlobalState = {
     token:"",
     userInfo:{
         username:""
     }
 }

 const globalSlice = createSlice({
     name: "global",
     initialState: globalState,
     reducers: {
         setToken(state: GlobalState, {payload}) {
             state.token = payload
         },
         setUserInfo(state: GlobalState, {payload}) {
             state.userInfo = payload
         }
     }
 })

 export const {setToken, setUserInfo} = globalSlice.actions
 export default globalSlice.reducer
2
3
4
5
6
7
8
9
10
11
12
13
14
15
16
17
18
19
20
21
22
23
24
25
26
在types/redux.ts中定义一下GlobalState的类型:
export interface UserInfo {
    username:string;
}

/* GlobalState */
export interface GlobalState {
    token:string;
    userInfo:UserInfo;
}

/* State */
export interface State {
    global: GlobalState
}
2
3
4
5
6
7
8
9
10
11
12
13
14
然后在redux/index.ts中创建store:
import { configureStore } from "@reduxjs/toolkit";
import global from "./modules/global";
import { combineReducers } from "@reduxjs/toolkit";

// combineReducers合并reducer
const reducers = combineReducers({
    global
})

export const store = configureStore({
    reducer: reducers
})
2
3
4
5
6
7
8
9
10
11
12
store创建完,需要在main.ts中使用Provider来包裹住需要使用store的组件:
import React from 'react'
import ReactDOM from 'react-dom/client'
import App from '@/App'
import "@/styles/reset.less"
import "antd/dist/reset.css"
import { Provider } from 'react-redux'
import { store } from "@/redux"

ReactDOM.createRoot(document.getElementById('root') as HTMLElement).render(
    <Provider store={store}>
        <App />
    </Provider>
)
2
3
4
5
6
7
8
9
10
11
12
13
14
# redux-persist持久化
redux-persist 主要用于帮助我们实现redux的状态持久化 所谓状态持久化就是将状态与本地存储联系起来,达到刷新或者关闭重新打开后依然能得到保存的状态。 先安装redux-persist,这个插件配合redux-toolkit使用时,需要redux-thunk
npm install redux-persist redux-thunk -S
安装完毕后改造一下redux/index.ts,创建persistedReducer,并且使用reduxThunk
import { configureStore } from "@reduxjs/toolkit";
import global from "./modules/global";
import { combineReducers } from "@reduxjs/toolkit";
import storage from "redux-persist/lib/storage";
import { persistReducer, persistStore } from "redux-persist"; //数据持久化
import reduxThunk from "redux-thunk"

// combineReducers合并reducer
const reducers = combineReducers({
    global
})

const presistConfig = {
    key:'react-admin',
    storage
}

const persistedReducer = persistReducer(presistConfig, reducers)

export const store = configureStore({
    reducer: persistedReducer,
    middleware: [reduxThunk]
})

export const persistor = persistStore(store)
2
3
4
5
6
7
8
9
10
11
12
13
14
15
16
17
18
19
20
21
22
23
24
25
在main.tsx中使用PersistGate标签包裹App组件:
import React from 'react'
import ReactDOM from 'react-dom/client'
import App from '@/App'
import "@/styles/reset.less"
import "antd/dist/reset.css"
import { Provider } from 'react-redux'
import { store, persistor } from "@/redux"
import { PersistGate } from 'redux-persist/integration/react'

ReactDOM.createRoot(document.getElementById('root') as HTMLElement).render(
    <Provider store={store}>
        <PersistGate persistor={persistor}>
            <App />
        </PersistGate>
    </Provider>
)
2
3
4
5
6
7
8
9
10
11
12
13
14
15
16
# 测试redux
在home.tsx中,简单写点代码测试一下store,点击按钮修改token:
import { useDispatch, useSelector } from "react-redux"
import { setToken } from "@/redux/modules/global"
import { State } from "@/types/redux"

const Home = () => {
    const dispatch = useDispatch()
    const {token} = useSelector((state:State) => state.global)

    const handleClick = () => {
        dispatch(setToken('123456789'))
    }

    return (
        <div>
            {token}
            <button onClick={handleClick}>修改token</button>
        </div>
    )
}

export default Home
2
3
4
5
6
7
8
9
10
11
12
13
14
15
16
17
18
19
20
21
使用useSelector钩子来获取state.global中的token。
setToken是global.ts中导出的修改token的reducers方法,传入dispath方法中来修改token。
点击按钮后,token成功变为123456789。
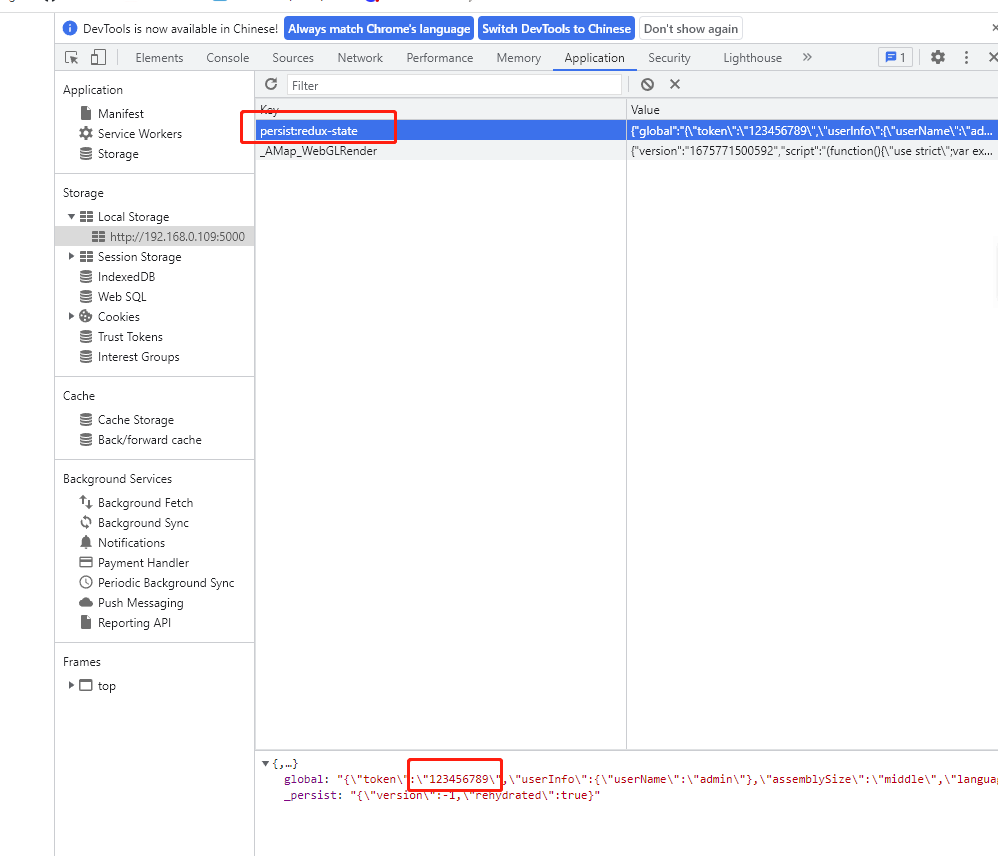
在控制台中可以看到数据持久化也是成功的。
# 封装axios
先安装axios和nprogress
npm install axios nprogress qs -S
npm install @types/nprogress @types/qs -D
2
# 定义枚举
// enum/httpEnum.ts
// * 请求枚举配置
/**
 * @description: 请求配置
 */
export enum ResultEnum {
    SUCCESS = 200,
    ERROR = 500,
    OVERDUE = 599,
    TIMEOUT = 10000,
    TYPE = "success"
}
2
3
4
5
6
7
8
9
10
11
12
# 定义判断类型的工具函数
// utils/is.ts
const toString = Object.prototype.toString

/**
 * @description: 判断值是否为某个类型
 */
export function is(val: unknown, type: string) {
    return toString.call(val) === `[object ${type}]`
}

/**
 * @description: 是否为函数
 */
export function isFunction<T = Function>(val: unknown): val is T {
    return is(val, "Function")
}
2
3
4
5
6
7
8
9
10
11
12
13
14
15
16
# 定义response返回类型
// types/api.ts
// * 请求响应参数(不包含data)
export interface Result {
    code: string;
    msg: string;
}

// * 请求响应参数(包含data)
export interface ResultData<T = any> extends Result {
    data?:T;
}
2
3
4
5
6
7
8
9
10
11
# 配置nprogress
// api/helper/nprogress.ts
import NProgress from "nprogress"
import "nprogress/nprogress.css"

NProgress.configure({
    easing: "ease", //动画方式
    speed: 500, // 递增进度条的速度
    showSpinner: true, // 是否显示加载ico
    trickleSpeed: 200, // 自动递增间隔
    minimum: 0.3 //初始化时的最小百分比
})

export default NProgress
2
3
4
5
6
7
8
9
10
11
12
13
# 封装错误状态判断方法
// api/helper/checkStatus.ts
import {message} from "antd"

/**
 * @description: 校验网络请求状态码
 * @param {Number} status
 * @return void
 */
export const checkStatus = (status: number): void => {
	switch (status) {
		case 400:
			message.error("请求失败!请您稍后重试");
			break;
		case 401:
			message.error("登录失效!请您重新登录");
			break;
		case 403:
			message.error("当前账号无权限访问!");
			break;
		case 404:
			message.error("你所访问的资源不存在!");
			break;
		case 405:
			message.error("请求方式错误!请您稍后重试");
			break;
		case 408:
			message.error("请求超时!请您稍后重试");
			break;
		case 500:
			message.error("服务异常!");
			break;
		case 502:
			message.error("网关错误!");
			break;
		case 503:
			message.error("服务不可用!");
			break;
		case 504:
			message.error("网关超时!");
			break;
		default:
			message.error("请求失败!");
	}
};
2
3
4
5
6
7
8
9
10
11
12
13
14
15
16
17
18
19
20
21
22
23
24
25
26
27
28
29
30
31
32
33
34
35
36
37
38
39
40
41
42
43
44
# 封装取消请求方法
// api/helper/axiosCancel.ts
import axios, {AxiosRequestConfig, Canceler} from "axios"
import {isFunction} from "@/utils/is"
import qs from "qs"

// * 声明一个Map用于存储每个请求的标识和取消函数
let pendingMap = new Map<string, Canceler>()

// * 序列化参数
export const getPendingUrl = (config: AxiosRequestConfig) =>
    [config.method,config.url,qs.stringify(config.data), qs.stringify(config.params)].join("&")

export class AxiosCanceler {
    /**
     * @description: 添加请求
     * @param {Object} config
     */
    addPending(config: AxiosRequestConfig) {
        // * 在请求开始前,对之前的请求做检查取消操作
        this.removePending(config)
        const url = getPendingUrl(config)
        config.cancelToken =
            config.cancelToken || new axios.CancelToken(cancel => {
                if(!pendingMap.has(url)) {
                    // 如果pending中不存在当前请求,则添加进去
                    pendingMap.set(url, cancel)
                }
            })
    }

    /**
     * @description: 移除请求
     * @param {Object} config
     */
    removePending(config: AxiosRequestConfig) {
        const url = getPendingUrl(config)

        if(pendingMap.has(url)) {
            //如果在pending中存在当前请求标识,需要取消当前请求,并且移除
            const cancel = pendingMap.get(url)
            cancel && cancel()
            pendingMap.delete(url)
        }
    }

    /**
     * @description: 清空所有pending
     */
    removeAllPending() {
        pendingMap.forEach(cancel => {
            cancel && isFunction(cancel) && cancel()
        })
        pendingMap.clear()
    }

    /**
     * @description: 重置
     */
    reset():void {
        pendingMap = new Map<string, Canceler>()
    }
}
2
3
4
5
6
7
8
9
10
11
12
13
14
15
16
17
18
19
20
21
22
23
24
25
26
27
28
29
30
31
32
33
34
35
36
37
38
39
40
41
42
43
44
45
46
47
48
49
50
51
52
53
54
55
56
57
58
59
60
61
62
# 封装axios
import NProgress from "./helper/nprogress";
import axios, {AxiosInstance, AxiosRequestConfig, AxiosError} from "axios"
import { store } from "@/redux"
import { setToken } from "@/redux/modules/global"
import { ResultEnum } from "@/enums/httpEnum"
import { message } from "antd"
import { checkStatus } from "./helper/checkStatus"
import { ResultData } from "@/types/api"
import { AxiosCanceler } from "./helper/axiosCancel"

const axiosCanceler = new AxiosCanceler()

const config = {
    //默认地址请求地址,可在.env开头文件中修改
    baseURL: import.meta.env.VITE_API_URL as string,
    // 设置超时时间(10s)
    timeout: ResultEnum.TIMEOUT as number,
    // 跨域时允许携带凭证
    widthCredentials: true
}

class RequestHttp {
    service: AxiosInstance;
    constructor(config: AxiosRequestConfig) {
        // 实例化axios
        this.service = axios.create(config)

        /**
         * @description 请求拦截器
         * 客户端发送请求 -> [请求拦截器] -> 服务器
         * token校验(JWT): 接受服务器返回的token,存储到redux/本地存储当中
         */
        this.service.interceptors.request.use(
            (config) => {
                NProgress.start()
                // * 将当前请求添加到 pending 中
                axiosCanceler.addPending(config)
                const token:string = store.getState().global.token
                config.headers["x-access-token"] = token
                return config
            },
            (error: AxiosError) => {
                return Promise.reject(error)
            }
        )

        /**
         * @description 响应拦截器
         * 服务器返回信息 -> [拦截统一处理] -> 客户端JS获取到信息
         */
        this.service.interceptors.response.use(
            (response) => {
                const {data, config} = response
                NProgress.done()
                // * 在请求结束后,移除本次请求(关闭loading)
                axiosCanceler.removePending(config)
                // * 登录失败(code == 599)
                if (data.code == ResultEnum.OVERDUE) {
                    store.dispatch(setToken(""))
                    message.error(data.msg)
                    window.location.hash = "/login"
                    return Promise.reject(data)
                }
                // * 全局错误信息拦截(防止下载文件的时候返回数据流,没有code,直接报错)
                if(data.code && data.code !== ResultEnum.SUCCESS) {
                    message.error(data.msg)
                    return Promise.reject(data)
                }
                // * 请求成功(在页面上除非特殊情况,否则不用处理失败逻辑)
                return data;
            },
            (error: AxiosError) => {
                const {response} = error
                NProgress.done()
                // 请求超时单独判断,请求超时没有response
                if(error.message.indexOf("timeout") !== -1) {
                    message.error("请求超时,请稍后再试")
                }
                // 根据响应的错误状态码, 做不同的处理
                if(response) {
                    checkStatus(response.status)
                }
                // 服务器结果都没有返回(可能服务器错误可能客户端断网) 断网处理:可以跳转到断网页面
                if(!window.navigator.onLine) {
                    window.location.hash = "/500"
                }
                return Promise.reject(error)
            }
        )
    }

    // * 常用请求方法封装
    get<T>(url:string,params?:object,_object = {}): Promise<ResultData<T>> {
        return this.service.get(url, {...params, ..._object})
    }
    post<T>(url:string,params?:object,_object = {}): Promise<ResultData<T>> {
        return this.service.post(url, {...params, ..._object})
    }
    put<T>(url:string,params?:object,_object = {}): Promise<ResultData<T>> {
        return this.service.put(url, {...params, ..._object})
    }
    delete<T>(url:string,params?:object,_object = {}): Promise<ResultData<T>> {
        return this.service.delete(url, {...params, ..._object})
    }
}

export default new RequestHttp(config)
2
3
4
5
6
7
8
9
10
11
12
13
14
15
16
17
18
19
20
21
22
23
24
25
26
27
28
29
30
31
32
33
34
35
36
37
38
39
40
41
42
43
44
45
46
47
48
49
50
51
52
53
54
55
56
57
58
59
60
61
62
63
64
65
66
67
68
69
70
71
72
73
74
75
76
77
78
79
80
81
82
83
84
85
86
87
88
89
90
91
92
93
94
95
96
97
98
99
100
101
102
103
104
105
106
107
# 封装全局Loading
封装一个全局的Loading条,首先封装一下组件
// components/Loading/index
import {Spin} from "antd"
import "./index.less"

const Loading = ({tip = "Loading"}: {tip?: string}) => {
    return <Spin tip={tip} size="large" className="request-loading"></Spin>
}

export default Loading
2
3
4
5
6
7
8
9
然后定义一下显示和隐藏loading的方法
// api/helper/serviceLoading.tsx
import ReactDOM from "react-dom/client"
import Loading from "@/components/Loading/index"

let needLoadingRequestCount = 0

// * 显示loading
export const showFullScreenLoading = () => {
    if(needLoadingRequestCount === 0) {
        let dom = document.createElement("div")
        dom.setAttribute("id", "loading")
        document.body.appendChild(dom)
        ReactDOM.createRoot(dom).render(<Loading />)
    }
    needLoadingRequestCount++
}

// * 隐藏loading
export const tryHideFullScreenLoading = () => {
    if(needLoadingRequestCount <= 0) return
    needLoadingRequestCount--
    if(needLoadingRequestCount == 0) {
        document.body.removeChild(document.getElementById("loading") as HTMLElement)
    }
}
2
3
4
5
6
7
8
9
10
11
12
13
14
15
16
17
18
19
20
21
22
23
24
25
然后在封装的RequestHttp类中使用:
//...
import { showFullScreenLoading, tryHideFullScreenLoading } from "./helper/serviceLoading"
//...

const axiosCanceler = new AxiosCanceler()

//...
class RequestHttp {
    service: AxiosInstance;
    constructor(config: AxiosRequestConfig) {
        //...
        this.service.interceptors.request.use(
            (config) => {
               //...
                config?.headers!.noLoading || showFullScreenLoading()
                //...
            },
            //...
        )

        /**
         * @description 响应拦截器
         * 服务器返回信息 -> [拦截统一处理] -> 客户端JS获取到信息
         */
        this.service.interceptors.response.use(
            (response) => {
                //...
                tryHideFullScreenLoading()
               //...
            },
            (error: AxiosError) => {
                //...
                tryHideFullScreenLoading()
                //...
            }
        )
    }
  //...
}

export default new RequestHttp(config)
2
3
4
5
6
7
8
9
10
11
12
13
14
15
16
17
18
19
20
21
22
23
24
25
26
27
28
29
30
31
32
33
34
35
36
37
38
39
40
41
刚刚新增的文件比较多,现在项目的目录结构如下:

# 对接登录
做了这么多,终于可以对接之前的登录接口了,需要做以下几件事
- 封装登录api
新建/api/modules/login.ts,调用刚刚封装好的HttpRequest类中的post方法:
  import {Login} from "@/types/login"
  import http from "@/api"

  /**
  * @name 登录模块
  */
  // 用户登录接口
  export const loginApi = (params: Login.ReqLoginForm) => {
      return http.post<Login.ResLogin>(`/login`, params)
  }
2
3
4
5
6
7
8
9
10
补全一下Login命名空间下登录接口返回的类型
  //  * 登录
  export namespace Login {
      export interface ReqLoginForm {
          username: string;
          password: string;
      }

      export interface ResLogin {
          access_token: string;
      }
  }
2
3
4
5
6
7
8
9
10
11
- 在登录页面调用
- 登录完保存用户信息以及token 登录接口上传的密码用md5加过密,因此安装一下 js-md5
npm install js-md5 -S
npm install @types/js-md5 -D
2
然后在 views/login/components/loginForm.tsx中调用
import {Button, Form, Input} from "antd"
import { UserOutlined, LockOutlined, CloseCircleOutlined } from "@ant-design/icons";
import { useState } from "react";
import { Login } from "@/types/login";
import { useDispatch } from "react-redux";
import { useNavigate } from "react-router-dom";
import md5 from "js-md5"
import { loginApi } from "@/api/modules/login";
import { setToken, setUserInfo } from "@/redux/modules/global";
// HOME_URL就是'/',我们在编写代码的时候要尽量少写重复的字符串
import { HOME_URL } from "@/utils/config";

const LoginForm = () => {
    const dispatch = useDispatch()
    const navigate = useNavigate()
    const [loading, setLoading] = useState<boolean>(false)
    const [form] = Form.useForm()

    //login
    const onFinish = async (loginForm: Login.ReqLoginForm) => {
        try { // 使用try catch来捕获代码块里所有的抛出异常
            // 将登录按钮的Loading改为true
            setLoading(true)
            // 密码使用md5加密
            loginForm.password = md5(loginForm.password)
            // 调用登录Api
            const {data} = await loginApi(loginForm)
            // token存入store
            dispatch(setToken(data?.access_token))
            // 存入userInfo
            dispatch(setUserInfo({userName: loginForm.username}))
            // 跳转到home主页
            navigate(HOME_URL)
        } catch(e) {
            console.log(e)
        } finally {
            // Loading置为false
            setLoading(false)
        }
    }

    //...后面的省略
2
3
4
5
6
7
8
9
10
11
12
13
14
15
16
17
18
19
20
21
22
23
24
25
26
27
28
29
30
31
32
33
34
35
36
37
38
39
40
41
42
43
登录成功后看一下token和用户信息已经保存成功了。

# 导航守卫
刚刚登录成功保存了token,新的需求就来了,在我们没有token的时候应该是禁止访问主页的,应该直接跳转回登录界面。
新建 routers/utils/authRouter.tsx,AuthRouter组件包裹在Router外,当token和pathname发生变化时,判断有没有token,如果没有就跳转到登录页面。
// routers/utils/authRouter.tsx
import {useLocation,useNavigate} from "react-router-dom"
import { useSelector } from "react-redux"
import { useEffect } from "react"
import { State } from "@/types/redux"

const AuthRouter = (props:any) => {
    const { token } = useSelector((state:State) => state.global)

    const { pathname } = useLocation()
    const navigate = useNavigate()

    useEffect(() => {
        !token && navigate('/login')
    },[token, pathname])

    return props.children
}

export default AuthRouter
2
3
4
5
6
7
8
9
10
11
12
13
14
15
16
17
18
19
20
// App.tsx
import { HashRouter } from "react-router-dom"
import Router from "@/routers/index"
import AuthRouter from "./routers/utils/authRouter"

const App = () => {
  return (
    <HashRouter>
      <AuthRouter>
        <Router />
      </AuthRouter>
    </HashRouter>
  )
}

export default App
2
3
4
5
6
7
8
9
10
11
12
13
14
15
16
17
# Layout
我们要做的后台管理系统,除了登录界面,几乎所有的其他界面布局都类似,拥有一个头部信息栏,以及左侧导航栏,这部分布局没必要重复写多次,因此我们可以写一个通用的布局
# Layout布局
Layout主要由侧边菜单,头部,中间内页部分,页脚组成,每个组件我们先简单写点东西占位
  // layouts/index.tsx
  import { Layout } from "antd"
  import { Outlet } from "react-router-dom"
  import LayoutMenu from "./components/Menu"
  import LayoutHeader from "./components/Header"
  import LayoutFooter from "./components/Footer"
  import "./index.less"

  const LayoutIndex = () => {
      const {Sider, Content} = Layout

      return (
          <section className="container">
              <Sider trigger={null} collapsed={false} width={220} theme="dark">
                  <LayoutMenu></LayoutMenu>
              </Sider>
              <Layout>
                  <LayoutHeader></LayoutHeader>
                  <Content>
                      <div className="content">
                          <Outlet />
                      </div>
                  </Content>
                  <LayoutFooter />
              </Layout>
          </section>
      )
  }

  export default LayoutIndex
2
3
4
5
6
7
8
9
10
11
12
13
14
15
16
17
18
19
20
21
22
23
24
25
26
27
28
29
30
# 关于二级路由以及Outlet
将home改造成二级路由并且单独抽出,以后方便渲染侧边栏。
// router/routerList.tsx
  import Layout from "@/layouts/index"
  import Home from "@/views/home"

  export const routerList = [
      {
          element: <Layout />,
          children: [
              {
                  path:"/",
                  element: <Home />,
                  meta: {
                      reqiureAuth: true,
                      title: "首页",
                      key: "home",
                      icon:'HomeOutlined'
                  }
              }
          ]
      }
  ]
2
3
4
5
6
7
8
9
10
11
12
13
14
15
16
17
18
19
20
21
// routers/index.tsx
  import {useRoutes} from "react-router-dom"
  import lazyLoad from "./utils/lazyLoad"
  import React from "react"
  import { routerList } from "./routerList"

  export const rootRouter = [
      {
          path:'/login',
          element: lazyLoad(React.lazy(() => import("@/views/login")))
      },
      ...routerList
  ]

  const Router = () => {
      const routes = useRoutes(rootRouter)

      return routes
  }

  export default Router
2
3
4
5
6
7
8
9
10
11
12
13
14
15
16
17
18
19
20
21
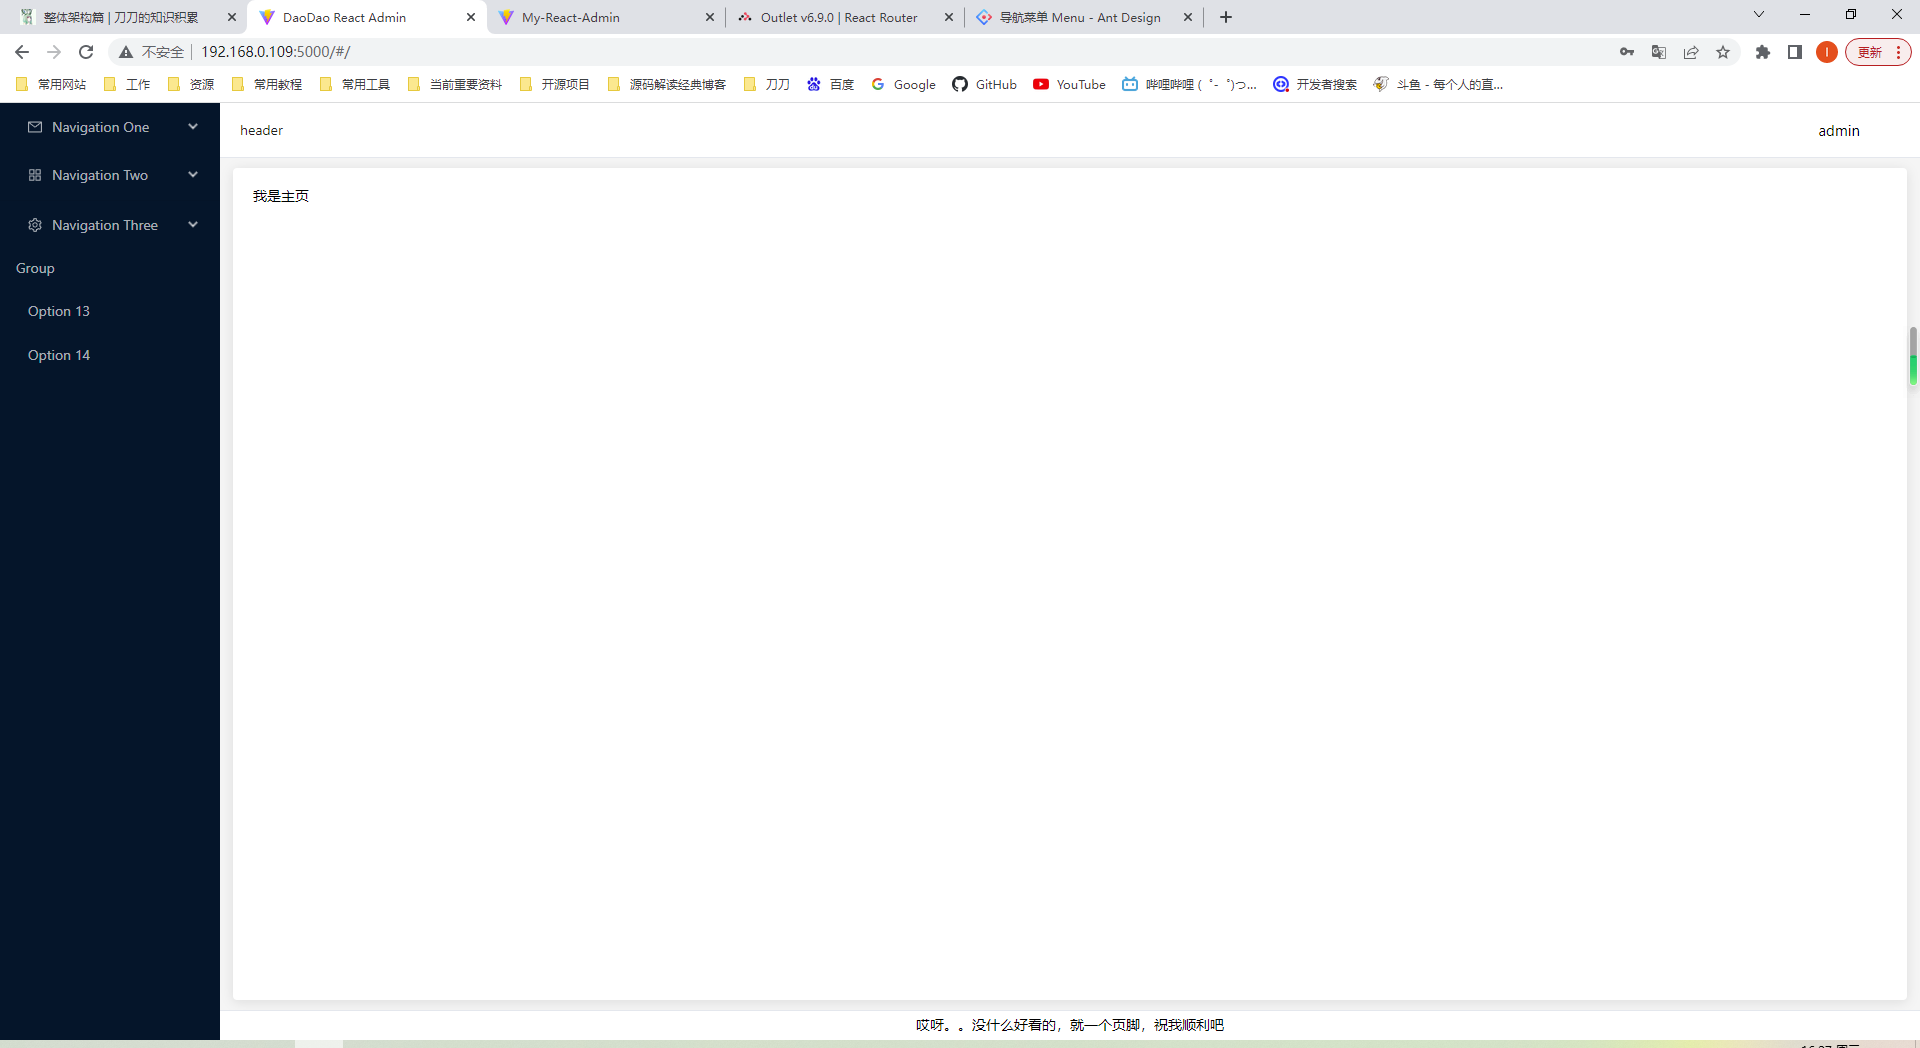
在父路由中的Outlet组件可以用来加载子路由,再次进入首页,现在首页的效果如下:
# 侧边栏
现在的侧边栏是我复制的antd官方的例子,实际上我是想让侧边栏显示出路由配置的页面。因此我们随意新增几条路由,这是一个三层嵌套的路由
// routers/routerList.tsx
 import Layout from "@/layouts/index"
 import Home from "@/views/home"

 export const routerList = [
     {
         element: <Layout />,
         children: [
             {
                 path:"/",
                 element: <Home />,
                 meta: {
                     reqiureAuth: true,
                     title: "首页",
                     key: "home",
                     icon:'HomeOutlined'
                 }
             }
         ]
     },
     {
         element: <Layout />,
         path:'/test',
         meta: {
             title:"测试菜单",
             icon:'DatabaseOutlined'
         },
         children: [
             {
                 path:"/test/test1",
                 element: <div>测试1</div>,
                 meta: {
                     reqiureAuth: true,
                     title: "测试菜单1",
                     key: "test1",
                     icon:'AppstoreOutlined'
                 }
             },
             {
                 path:"/test/test2",
                 element: <Outlet />,
                 meta: {
                     reqiureAuth: true,
                     title: "测试菜单2",
                     key: "test2",
                     icon:'AppstoreOutlined'
                 },
                 children:[{
                     path:"/test/test2/test3",
                     element: <div>测试3</div>,
                     meta: {
                         reqiureAuth: true,
                         title: "测试菜单3",
                         key: "test3",
                         icon:'AppstoreOutlined'
                     },
                 }]
             }
         ]
     }
 ]
2
3
4
5
6
7
8
9
10
11
12
13
14
15
16
17
18
19
20
21
22
23
24
25
26
27
28
29
30
31
32
33
34
35
36
37
38
39
40
41
42
43
44
45
46
47
48
49
50
51
52
53
54
55
56
57
58
59
60
61
# 根据路由表循环出侧边栏数据
首先应该从上面的路由列表作为原始数据,生成正确的数据结构。 先定义一下接口类型:
// types/menu.ts
 export interface Meta {
     title?:string; //路由名称
     icon?:string; //图标
     key?:string; //唯一标识
     isLink?:string; //是否为外链
     [itemName:string]:any; //还可以根据需要自己增减
 }

 // 原始router类型
 export interface RouterItem {
     element: JSX.Element; // 组件
     path?:string; // 路由地址
     meta?: Meta;
     children?: RouterItem[] // 子路由
 }

 // Menu数据类型
 export interface MenuOptions {
     path: string; // 菜单一定要有path
     title: string;  // 菜单一定要有title
     icon?: string;
     isLink?: string;
     close?: boolean;
     children?: MenuOptions[]
 }
2
3
4
5
6
7
8
9
10
11
12
13
14
15
16
17
18
19
20
21
22
23
24
25
26
27
然后使用递归获取正确的侧边栏数据:
// utils/menu.ts
import { MenuOptions, RouterItem } from "@/types/menu"

 /**
  * @description 通过路由表生成侧边栏数据
  * @param {RouterItem[]} 原始路由表
  * @return {Menu.MenuOptions[]}
  */
 export const generateMenuData = (routerList: RouterItem[]):any[] => {
     const menuList:MenuOptions[] = []
     routerList.forEach(item => {
         // 如果没有子菜单,直接显示该菜单
         if(!item.children || item.children.length == 0 ) {
             // 有path和title的才可以被添加进来
             if(item.path && item?.meta?.title) {
                 menuList.push({
                     path: item.path,
                     title: item.meta.title,
                     icon: item?.meta?.icon,
                     isLink: item?.meta?.isLink
                 })
             }
         }else{
             // 如果子路由长度为1,并且该路由没有title,就直接将子路由往上提一级
             if(item?.children?.length == 1 && !item?.meta?.title){
                 menuList.push(...generateMenuData(item.children))
             }else{
                 // 有path和title的才可以被添加进来
                 if(item.path && item?.meta?.title) {
                     menuList.push({
                         path: item.path,
                         title: item.meta.title,
                         icon: item?.meta?.icon,
                         isLink: item?.meta?.isLink,
                         children: generateMenuData(item.children)
                     })
                 }
             }
         }
     })
     return menuList
 }
2
3
4
5
6
7
8
9
10
11
12
13
14
15
16
17
18
19
20
21
22
23
24
25
26
27
28
29
30
31
32
33
34
35
36
37
38
39
40
41
42
生成了侧边栏数据后,这个数据还不能直接被用到antd中,还要被转换一次:
// layouts/components/Menu/index.tsx
// ....
 const LayoutMenu = () => {
 type MenuItem = Required<MenuProps>['items'][number];

 function getItem(
     label: React.ReactNode,
     key: React.Key,
     icon?: React.ReactNode,
     children?: MenuItem[],
     type?: 'group',
     ): MenuItem {
     return {
         key,
         icon,
         children,
         label,
         type,
     } as MenuItem;
     }

     // 将icon字符串转换为ReactIcon
     const customIcons: {[key:string]: any} = Icons

     const addIcon = (name:string|undefined) => {
     return name ? React.createElement(customIcons[name]) : null
     }

     // 将menuList处理为antd所需的格式
     const deepLoopFloat = (menuList: MenuOptions[], newArr:MenuItem[] = []) => {
     menuList.forEach((item: MenuOptions) => {
         if (!item?.children?.length) {
             newArr.push(getItem(item.title, item.path, addIcon(item.icon)))
         } else {
             newArr.push(getItem(item.title, item.path, addIcon(item.icon), deepLoopFloat(item.children)))
         }
     })
     return newArr
     }

     // 生成menuList的数据
     const [menuList, setMenuList] = useState<MenuProps['items']>([])
     const getMenuList = () => {
     const data:MenuOptions[] = generateMenuData(routerList)
         setMenuList(deepLoopFloat(data))
     }

     useEffect(() => {
         getMenuList()
     },[])

     return (
     <div className="menu">
         <Menu
             theme="dark"
             mode="inline"
             items={menuList}
         />
     </div>
     );
 }

 export default LayoutMenu
2
3
4
5
6
7
8
9
10
11
12
13
14
15
16
17
18
19
20
21
22
23
24
25
26
27
28
29
30
31
32
33
34
35
36
37
38
39
40
41
42
43
44
45
46
47
48
49
50
51
52
53
54
55
56
57
58
59
60
61
62
63
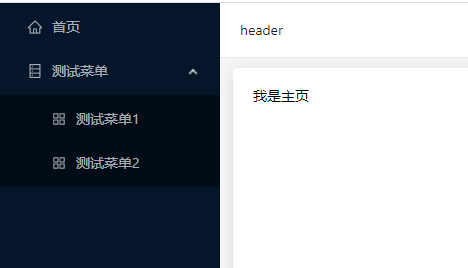
现在侧边栏就显示出来了
# 点击跳转链接
给Menu组件绑定onClick方法,并根据点击的key来跳转
 /**
  * @description 递归查询对应的路由
  * @param {String} path 当前访问地址
  * @param {Array} routes 路由列表
  * @return array
  */
 export const searchRoute = (path:string, menuData: MenuOptions[] = []): any => {
     let result = {}
     for(let item of menuData) {
         if(item.path === path) {
             return item
         }
         if(item.children) {
             const res = searchRoute(path, item.children)
             if (Object.keys(res).length) {
                 result = res
             }
         }
     }
     return result
 }

// 点击当前菜单跳转页面
 const navigate = useNavigate()
 const clickMenu:MenuProps['onClick'] = ({key}) => {
   const route = searchRoute(key, menuData)
   if(route.isLink) {
       window.open(route.isLink, "_blank")
   }else{
       navigate(key)
   }
 }
2
3
4
5
6
7
8
9
10
11
12
13
14
15
16
17
18
19
20
21
22
23
24
25
26
27
28
29
30
31
32
# 如何判断当前高亮菜单和展开菜单
原理就是利用useLocation钩子,来获取当前页面的信息,打印一下useLocation(),
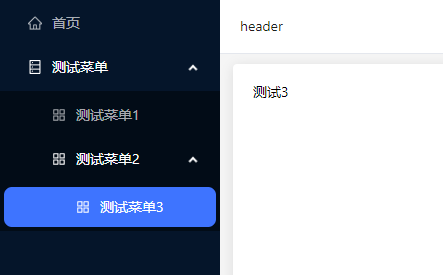
因此我们应该用pathname字段来判断高亮的是哪个菜单。
假设当前的pathname为'/test/test2/test3',那么需要被展开的菜单应该是 '/test','/test/test2',
/**
  * @description 获取需要展开的subMenu
  * @param {String} path 当前访问地址
  * @return array
  */
 export const getOpenKeys = (path:string) => {
     let arr = path.split("/")
     let openArr = []
     let openString = ''
     for(let i = 0; i < arr.length - 1; i++) {
         if(arr[i]){
             openString += `/${arr[i]}`
             openArr.push(openString)
         }
     }
     return openArr
 }
2
3
4
5
6
7
8
9
10
11
12
13
14
15
16
17
# 展开收起侧边栏
展开收起侧边栏原理是将isCollapse存入store中,然后监听window的resize事件,当屏幕宽度小于1200时,收起侧边栏,屏幕宽度大于1200时,展开侧边栏。 我们来改造一下layouts/index.tsx
 import { Layout } from "antd"
 import { Outlet } from "react-router-dom"
 import LayoutMenu from "./components/Menu"
 import LayoutHeader from "./components/Header"
 import LayoutFooter from "./components/Footer"
 import "./index.less"
 import { useDispatch, useSelector } from "react-redux"
 import { State } from "@/types/redux"
 import { useEffect } from "react"
 import { updateCollapse } from "@/redux/modules/menu"

 const LayoutIndex = () => {
     const dispatch = useDispatch()
     const {Sider, Content} = Layout
     const {isCollapse} = useSelector((state:State) => state.menu)

     // 监听窗口大小变化
     const listeningWindow = () => {
         let screenWidth = document.body.clientWidth;
         if(!isCollapse && screenWidth < 1200) {
             dispatch(updateCollapse(true))
         }
         if(isCollapse && screenWidth > 1200) {
             dispatch(updateCollapse(false))
         }
     }

     useEffect(() => {
         window.addEventListener('resize', listeningWindow)
         // 清除副作用
         return () => {
             window.removeEventListener('resize', listeningWindow)
         }
     },[isCollapse])

     return (
         <section className="container">
             <Sider trigger={null} collapsed={isCollapse} width={220} theme="dark">
                 <LayoutMenu></LayoutMenu>
             </Sider>
             <Layout>
                 <LayoutHeader></LayoutHeader>
                 <Content>
                     <div className="content">
                         <Outlet />
                     </div>
                 </Content>
                 <LayoutFooter />
             </Layout>
         </section>
     )
 }

 export default LayoutIndex
2
3
4
5
6
7
8
9
10
11
12
13
14
15
16
17
18
19
20
21
22
23
24
25
26
27
28
29
30
31
32
33
34
35
36
37
38
39
40
41
42
43
44
45
46
47
48
49
50
51
52
53
54
# header
# 面包屑导航
一般的网站都有个面包屑导航,我们使用存在redux中的menuData递归找到所有的path,并使用递归,给每个path找到对应的面包屑的数据。
/**
  * @description 递归当前路由的所有关联路由,生成面包屑导航
  * @param {String} path 当前访问地址
  * @param {Array} menuList 菜单列表
  * @return array
  */
 export const getBreadcrumbList = (path: string, menuList: MenuOptions[]) => {
     let tempPath: MenuOptions[] = []
     try {
         const getNodePath = (node: MenuOptions) => {
             tempPath.push(node);
             // 找到符合条件的节点,通过throw终止掉递归
             if (node.path === path) {
                 throw new Error("GOT IT!");
             }
             if (node.children && node.children.length > 0) {
                 for (let i = 0; i < node.children.length; i++) {
                     getNodePath(node.children[i]);
                 }
                 // 当前节点的子节点遍历完依旧没找到,则删除路径中的该节点
                 tempPath.pop();
             } else {
                 // 找到叶子节点时,删除路径当中的该叶子节点
                 tempPath.pop();
             }
         };
         for (let i = 0; i < menuList.length; i++) {
             getNodePath(menuList[i]);
         }
     } catch (e) {
         return tempPath.map(item => item.title);
     }
 }

 /**
  * @description 双重递归 找出所有 面包屑 生成对象存到 redux 中,就不用每次都去递归查找了
  * @param {String} menuList 当前菜单列表
  * @return object
  */
 export const findAllBreadcrumb = (menuList:MenuOptions[]) : {[key: string]:string[]|undefined} => {
     let handleBreadcrumbList: {[key: string]:string[]|undefined} = {}
     const loop = (menuItem: MenuOptions) => {
         if(menuItem?.children?.length) {
             menuItem.children.forEach(item => loop(item))
         }else{
             handleBreadcrumbList[menuItem.path] = getBreadcrumbList(menuItem.path, menuList)
         }
     }
     menuList.forEach(item => loop(item))
     return handleBreadcrumbList
 }
2
3
4
5
6
7
8
9
10
11
12
13
14
15
16
17
18
19
20
21
22
23
24
25
26
27
28
29
30
31
32
33
34
35
36
37
38
39
40
41
42
43
44
45
46
47
48
49
50
51
可能这样比较难理解,我们看一下得到的handleBreadcrumbList是什么,就清楚我在做什么了。

只需要用页面useLocation钩子中的pathname作为键就能快速得到面包屑导航的数据了。
# 个人信息窗口弹出,以及如何暴露方法给父组件
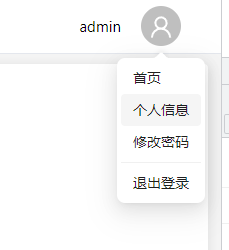
这是写好的个人信息下拉菜单,现在希望点击个人信息的时候能弹出个人信息的窗口来,我希望个人信息组件能够向外暴露出一个打开窗口的方法。
react中其实有解决办法:
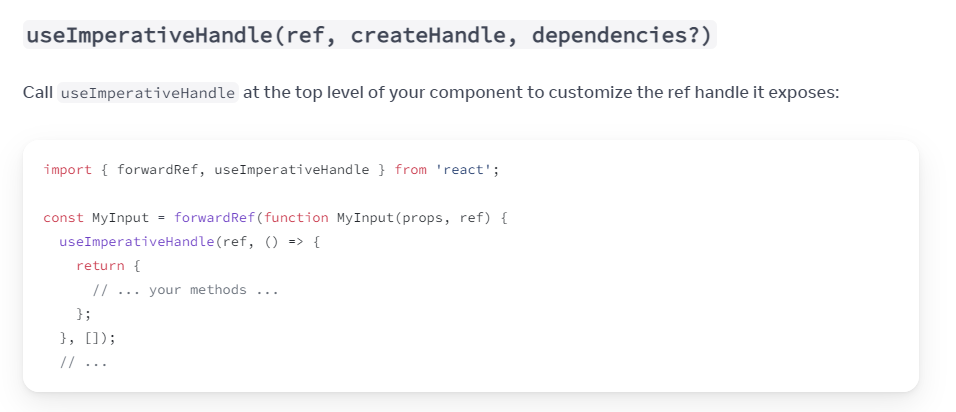
参考上图,使用useImperativeHandle Hooks,封装一个个人信息组件:
 import { Modal } from "antd"
 import { useImperativeHandle, useState, forwardRef, Ref, ForwardedRef } from "react"

 export interface InfoRef {
     showModal():void
 }

 const InfoModal = (props:{},ref:ForwardedRef<InfoRef>) => {

     const [modalVisible, setModalVisible] = useState(false)

     const showModal = () => {
         setModalVisible(true)
     }

     useImperativeHandle(
         ref,
         () => ({
             showModal() {
                 showModal()
             }
         }),
         []
     );

     const handleOk = () => {
         setModalVisible(false)
     }

     const handleCancel = () => {
         setModalVisible(false)
     }

     return (
         <Modal
             title="个人信息"
             open={modalVisible}
             onOk={handleOk}
             onCancel={handleCancel}
             destroyOnClose={true}
         >
             <p>个人信息:不过暂时没有咯</p>
             <p>你们就随便看看就行了</p>
             <p>好了别看了,知道我长得帅了</p>
         </Modal>
     )
 }

 export default forwardRef(InfoModal)
2
3
4
5
6
7
8
9
10
11
12
13
14
15
16
17
18
19
20
21
22
23
24
25
26
27
28
29
30
31
32
33
34
35
36
37
38
39
40
41
42
43
44
45
46
47
48
49
然后在父组件中使用ref就可以获取到InfoModal:
const infoRef = useRef<InfoRef>(null)

// 调用 infoRef.current?.showModal()就可以打开弹窗
// infoRef.current?.showModal()

<InfoModal ref={infoRef} />
2
3
4
5
6
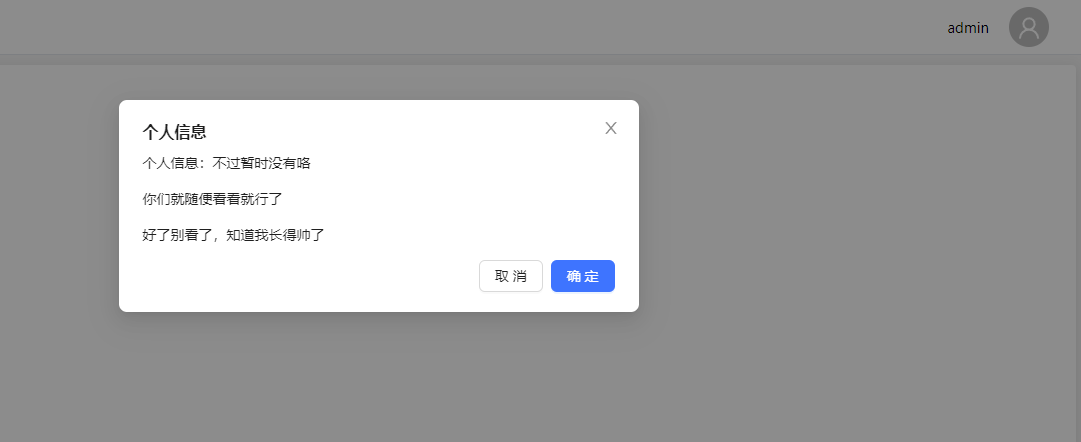
打开成功啦
# tabs
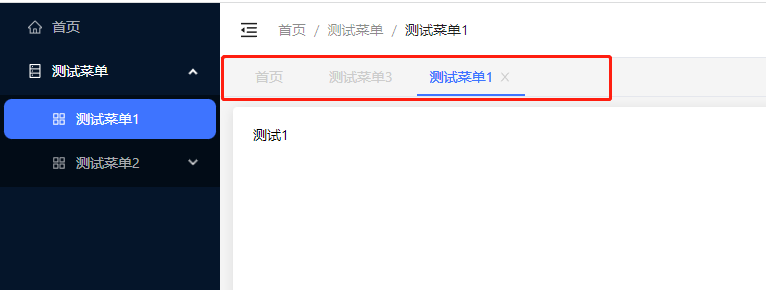
简单说一下这个tab菜单的原理吧:
- 使用useLocation获取到pathname
- 用useEffect监听pathname,打开了新页面就往tabs列表里加一项
    import { useDispatch, useSelector } from "react-redux"
    import { setTabsList } from "@/redux/modules/tabs"
    import { useLocation, useNavigate } from "react-router-dom"
    import { searchRoute } from "@/utils/menu"
    import React, { useEffect, useState } from "react"
    import { Tabs } from "antd"
    import { HOME_URL } from "@/utils/config"
    import "./index.less"
    import { State } from "@/types/redux"
    import { MenuOptions } from "@/types/menu"

    const LayoutTabs = () => {
        const dispatch = useDispatch()
        const { tabsList } = useSelector((state:State) => state.tabs)
        const { menuData } = useSelector((state:State) => state.menu)
        const { pathname } = useLocation()
        const navigate = useNavigate()
        const [activeValue, setActiveValue] = useState(pathname)

        useEffect(() => {
            addTabs()
        }, [pathname])

        const addTabs = () => {
            const route = searchRoute(pathname, menuData)
            let newTabsList = JSON.parse(JSON.stringify(tabsList))
            if(tabsList.every((item:MenuOptions) => item.path !== route.path) && (route.path !== HOME_URL)) {
                newTabsList.push({title: route?.title, path: route.path})
            }
            dispatch(setTabsList(newTabsList))
            setActiveValue(pathname)
        }

        const delTabs = (path: React.MouseEvent | React.KeyboardEvent | string) => {
            if(pathname === path) {
                let index = tabsList.findIndex((item:MenuOptions) => item.path === path)
                if(tabsList.length > 1) {
                    if(tabsList[index + 1]) {
                        navigate(tabsList[index + 1].path)
                    }else{
                        navigate(tabsList[index - 1].path)
                    }
                }else{
                    navigate(HOME_URL)
                }
            }
            dispatch(setTabsList(tabsList.filter((item:MenuOptions) => item.path !== path)))
        }

        const clickTabs = (path:string) => {
            navigate(path)
        }

        return (
            <div className="tabs">
                <Tabs
                    activeKey={activeValue}
                    onChange={clickTabs}
                    hideAdd
                    type="editable-card"
                    onEdit={delTabs}
                    items={
                    [
                        {
                            label:'首页',
                            key:HOME_URL,
                            closable: false
                        },
                        ...tabsList.map((item:MenuOptions) => {
                            return {
                                label: item.title,
                                key: item.path
                            }
                        })
                    ]
                }/>
            </div>
        )
    }

    export default LayoutTabs
2
3
4
5
6
7
8
9
10
11
12
13
14
15
16
17
18
19
20
21
22
23
24
25
26
27
28
29
30
31
32
33
34
35
36
37
38
39
40
41
42
43
44
45
46
47
48
49
50
51
52
53
54
55
56
57
58
59
60
61
62
63
64
65
66
67
68
69
70
71
72
73
74
75
76
77
78
79
80
81
