骚操作!解决百度地图marker太多卡顿
更新时间: 2021-06-16 16:09:08
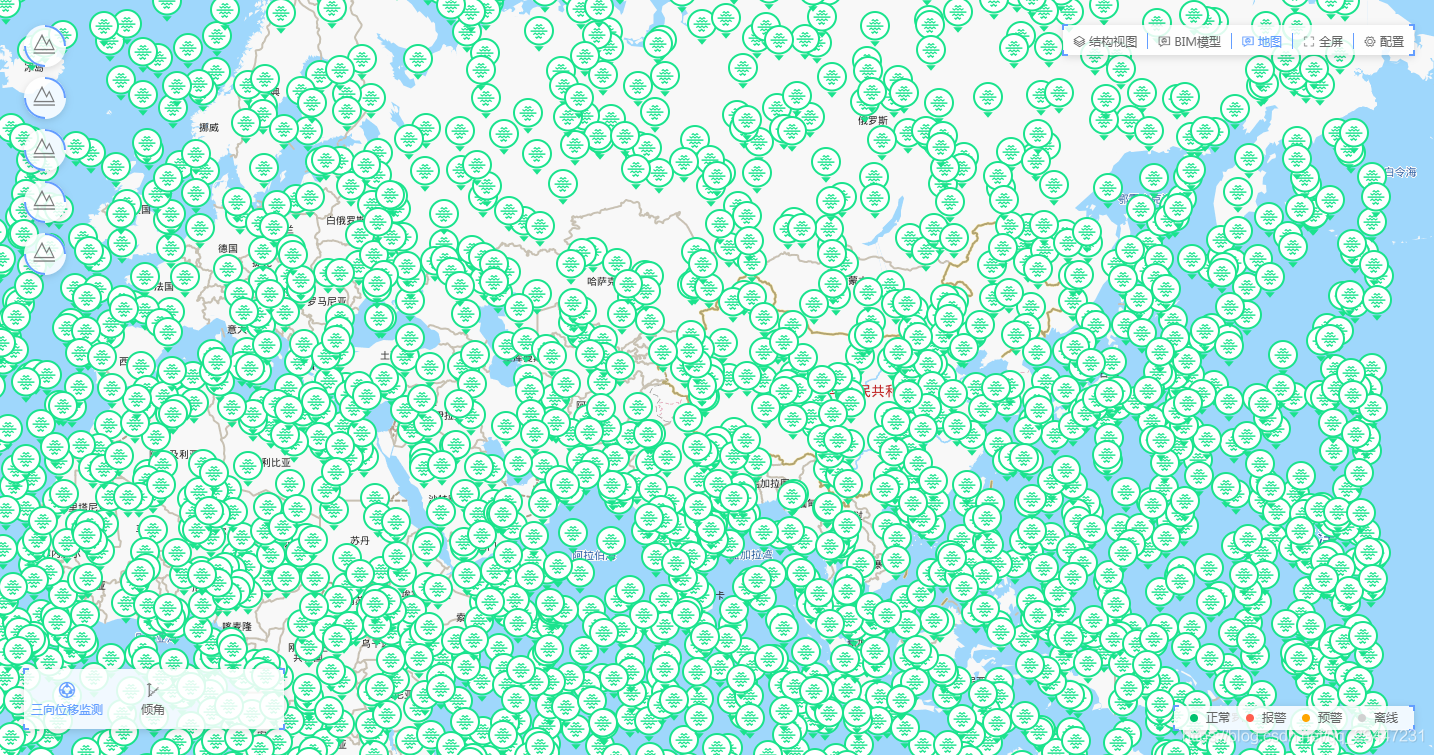
用过百度地图的小伙伴应该都知道,百度地图的marker太多的时候会造成地图加载卡顿。这个问题其实可以通过海量点来解决,但是海量点的图标实在太丑了,我们家UI不干,所以只能另辟蹊径啦
# 原理
其实原理很简单,使用的是百度地图的CanvasLayer,直接在地图上画一层canvas。

demo代码:
var mp = new BMap.Map("container");
mp.centerAndZoom(new BMap.Point(116.3964,39.9093), 10);
mp.enableScrollWheelZoom();

var canvasLayer = new BMap.CanvasLayer({
    update: update
});

function update() {
    var ctx = this.canvas.getContext("2d");

    if (!ctx) {
        return;
    }

    ctx.clearRect(0, 0, ctx.canvas.width, ctx.canvas.height);

    var temp = {};
    ctx.fillStyle = "rgba(50, 50, 255, 0.7)";
    ctx.beginPath();
    var data = [
        new BMap.Point(116.297047,39.979542),
        new BMap.Point(116.321768,39.88748),
        new BMap.Point(116.494243,39.956539)
    ];

    for (var i = 0, len = data.length; i < len; i++) {
        var pixel = mp.pointToPixel(data[i]);
        ctx.fillRect(pixel.x, pixel.y, 30, 30);
    }
}
mp.addOverlay(canvasLayer);
1
2
3
4
5
6
7
8
9
10
11
12
13
14
15
16
17
18
19
20
21
22
23
24
25
26
27
28
29
30
31
32
2
3
4
5
6
7
8
9
10
11
12
13
14
15
16
17
18
19
20
21
22
23
24
25
26
27
28
29
30
31
32
在update方法里,this.canvas代表的是当前的canvas对象,其余的代码和写canvas没有什么区别,但是写原生的canvas太费脑子了,所以可以使用canvas库来简化一下代码。
# 代码实现
canvas库我使用了zrender,zrender不能说是最好用,但是我用顺手了习惯了。
在update方法里记得注意this的指向
<template>
    <div class="map-board">
        <div id="mapBoard" style="width:100%;height:100%;"></div>
        <div class="tool-tip-wrapper" ref="tooltip">
            <div class="tool-tip-container" v-if="curPoint">
                <span>测点名称{{curPoint.name}}</span>
            </div>
        </div>
    </div>
</template>

<script>
    import * as zrender from 'zrender'  //引入zrender库

    export default {
        data(){
          return {
              zr:null,
              curPoint:null,
              canvasWidth:0,
              canvasHeight:0,
              pointArr:[
                  {name:'测点1',position:new BMap.Point(116.297047,39.979542)},
                  {name:'测点2',position:new BMap.Point(116.321768,39.88748)},
                  {name:'测点3',position:new BMap.Point(116.494243,39.956539)}
              ]
          }
        },
        mounted() {
            var mp = new BMap.Map("mapBoard");
            mp.centerAndZoom(new BMap.Point(116.3964,39.9093), 10);
            mp.enableScrollWheelZoom();

            let that = this

            var canvasLayer = new BMap.CanvasLayer({
                update: update
            });

            function update() {
                if(!this.zr) {
                    that.zr = zrender.init(this.canvas); //初始化zrender
                    that.canvasWidth = that.zr.getWidth();
                    that.canvasHeight = that.zr.getHeight();
                }else{
                    that.zr.clear() //先清空之前的
                }

                for (var i = 0, len = that.pointArr.length; i < len; i++) {
                    var pixel = mp.pointToPixel(that.pointArr[i].position);
                    var circle = new zrender.Image({
                        style: {
                            image:"/static/2dicon/zd0.png", //这张是我自己本地的一张图片
                            x: pixel.x - 15,
                            y: pixel.y - 36,
                            width:30,
                            height:36
                        },
                        data:that.pointArr[i]
                    });
                    //点击事件
                    circle.on('click',(e) => {
                        console.log(e)
                    })
                    //鼠标移入
                    circle.on('mousemove',(ev)=>{
                        that.showDetailWindow(ev)
                    })
                    //鼠标移出
                    circle.on('mouseout',(e)=>{
                        that.hideDetailWindow(e)
                    })
                    that.zr.add(circle);
                }
            }
            mp.addOverlay(canvasLayer);

            //根据点的位置自动设置地图的视口
            mp.setViewport(this.pointArr.map(item => item.position))
        },
        methods:{
            /*
      * 显示浮层位置,并且设置数据
      * */
            showDetailWindow(e){
                this.$refs.tooltip.style.display = 'block'

                //计算一下浮层的位置
                let top = 0;
                let left = 0;

                if (e.offsetX + 270 > this.canvasWidth) {
                    left = e.offsetX - 270
                } else {
                    left = e.offsetX
                }

                if(e.event.pageY + this.$refs.tooltip.clientHeight + 10 > window.innerHeight){
                    top = e.offsetY - this.$refs.tooltip.clientHeight - 10
                }else{
                    top = e.offsetY
                }

                //设置一下浮层的位置
                this.$refs.tooltip.style.top = (top + 10) + 'px'
                this.$refs.tooltip.style.left = (left + 10) + 'px'
                this.curPoint = e.target.data
            },
            /*
            * 隐藏浮层
            * */
            hideDetailWindow(e){
                this.$refs.tooltip.style.display = 'none'
                this.curPoint = null
                if(this.infoid) {
                    document.getElementById(this.infoid).style.display = 'none'
                }
            },
        }
    }
</script>

<style lang="scss" scoped>
    .map-board{
        height:100%;
        position: relative;
        .tool-tip-wrapper{
            position:absolute;
            display: none;
            border-radius: 10px;
            width:250px;
            padding:10px;
            background: rgba(0,0,0,0.5);
            color:#fff;
            line-height: 25px;
        }
    }
</style>
1
2
3
4
5
6
7
8
9
10
11
12
13
14
15
16
17
18
19
20
21
22
23
24
25
26
27
28
29
30
31
32
33
34
35
36
37
38
39
40
41
42
43
44
45
46
47
48
49
50
51
52
53
54
55
56
57
58
59
60
61
62
63
64
65
66
67
68
69
70
71
72
73
74
75
76
77
78
79
80
81
82
83
84
85
86
87
88
89
90
91
92
93
94
95
96
97
98
99
100
101
102
103
104
105
106
107
108
109
110
111
112
113
114
115
116
117
118
119
120
121
122
123
124
125
126
127
128
129
130
131
132
133
134
135
136
137
138
好啦。。来看下效果

放上6000个点也不卡哦

好啦~问题解决啦~
# 后记
有很多朋友会遇到缩放后点偏位的问题,这个问题只需要加上一行就行啦,这是由于缩放之后zrender的画布像素尺寸没有变化导致的。
that.zr.resize()
1
