vue3 + vite创建后台管理系统
最近公司遇到个客户项目全是CRUD,没有难度,但是页面又特别多,感觉项目没有意思,于是我拿这个项目练手使用vite + vue3 + element-plus
# 如何用vite创建vue3项目
vite是一个web开发构建工具,由于其原生ES模块导入方式,可以实现闪电般的冷服务器启动。如何用vite构建vue3项目呢:
# npm 6.x
npm init vite@latest <project-name> --template vue

# npm 7+ 需要加上额外的双短横线
npm init vite@latest <project-name> -- --template vue

cd <project-name>
npm install
npm run dev
2
3
4
5
6
7
8
9
这样就可以快速的创建一个vue3项目
然后我们安装上必要的依赖
# dependencies
"axios": "^0.24.0",
"element-plus": "^1.2.0-beta.3",
"nprogress": "^0.2.0",
"vue": "^3.2.16",
"vue-router": "^4.0.12",
"vuex": "^4.0.2",

# devDependencies
"mockjs": "^1.1.0",
"sass": "^1.43.4",
2
3
4
5
6
7
8
9
10
11
# @别名配置
使用webpack时可以配置alias来简化一长串的路径,vite也可以,我们将src的目录配置别名@:
// vite.config.js
import { defineConfig } from 'vite'
const {resolve} = require('path')
import vue from '@vitejs/plugin-vue'

// https://vitejs.dev/config/
export default defineConfig({
  plugins: [vue()],
  resolve:{
    alias: {
      '@': resolve(__dirname, 'src')
    }
  }
})
2
3
4
5
6
7
8
9
10
11
12
13
14
# 文件目录划分
├── public (不打包不压缩的文件放这里,比如图片之类的)
├── src
│   ├── assets (放一些静态的图片图标之类)
│   ├── components (公共组件)
│   ├── mock (数据模拟)
│   ├── router (路由)
│   ├── store (vuex)
│   ├── style (样式文件)
│   ├── utils (公用的js)
│   ├── views (界面都放在这里)
│   ├── App.vue (vue挂载的组件)
│   └── main.js (入口js)
│
├── .env.dev (dev环境配置)
├── .env.prod (prod环境配置)
├── package.json
├── README.md
├── vite.config.js
└── index.html
2
3
4
5
6
7
8
9
10
11
12
13
14
15
16
17
18
19
# 配置环境变量
vite在一个特殊的import.meta.env对象上暴露环境变量。这里有一些普遍使用的内建变量:
import.meta.env.MODE:string应用运行基于的模式。import.meta.env.BASE_URL:string应用正被部署在的base URL。它由base配置项决定。import.meta.env.PROD:boolean应用是否运行在生产环境import.meta.env.DEV:boolean应用是否运行在开发环境(永远与import.meta.env.PROD相反)
注意
在生产环境中,这些环境变量会在构建时被静态替换,因此请在引用他们时使用完全静态的字符串。动态的key将无法生效。例如,动态key取值 import.meta.env[key]是无效的。
# 修改模式
在package.json中修改scripts选项:
"scripts": {
    "dev": "vite --mode dev",
    "build": "vite build --mode prod",
    "serve": "vite preview"
},
2
3
4
5
现在运行dev,模式就是dev。运行build, 模式就是prod。
# 配置.env文件
在根目录新建.env.dev和.env.prod文件。为了防止意外地将一些环境变量泄漏到客户端,只有以VITE_为前缀的变量才会暴露给经过vite处理的代码。
比如 ABC和VITE_ABC中,只有VITE_ABC会暴露为import.meta.env.VITE_ABC。
# 写布局和侧边栏组件
# 后台管理系统布局
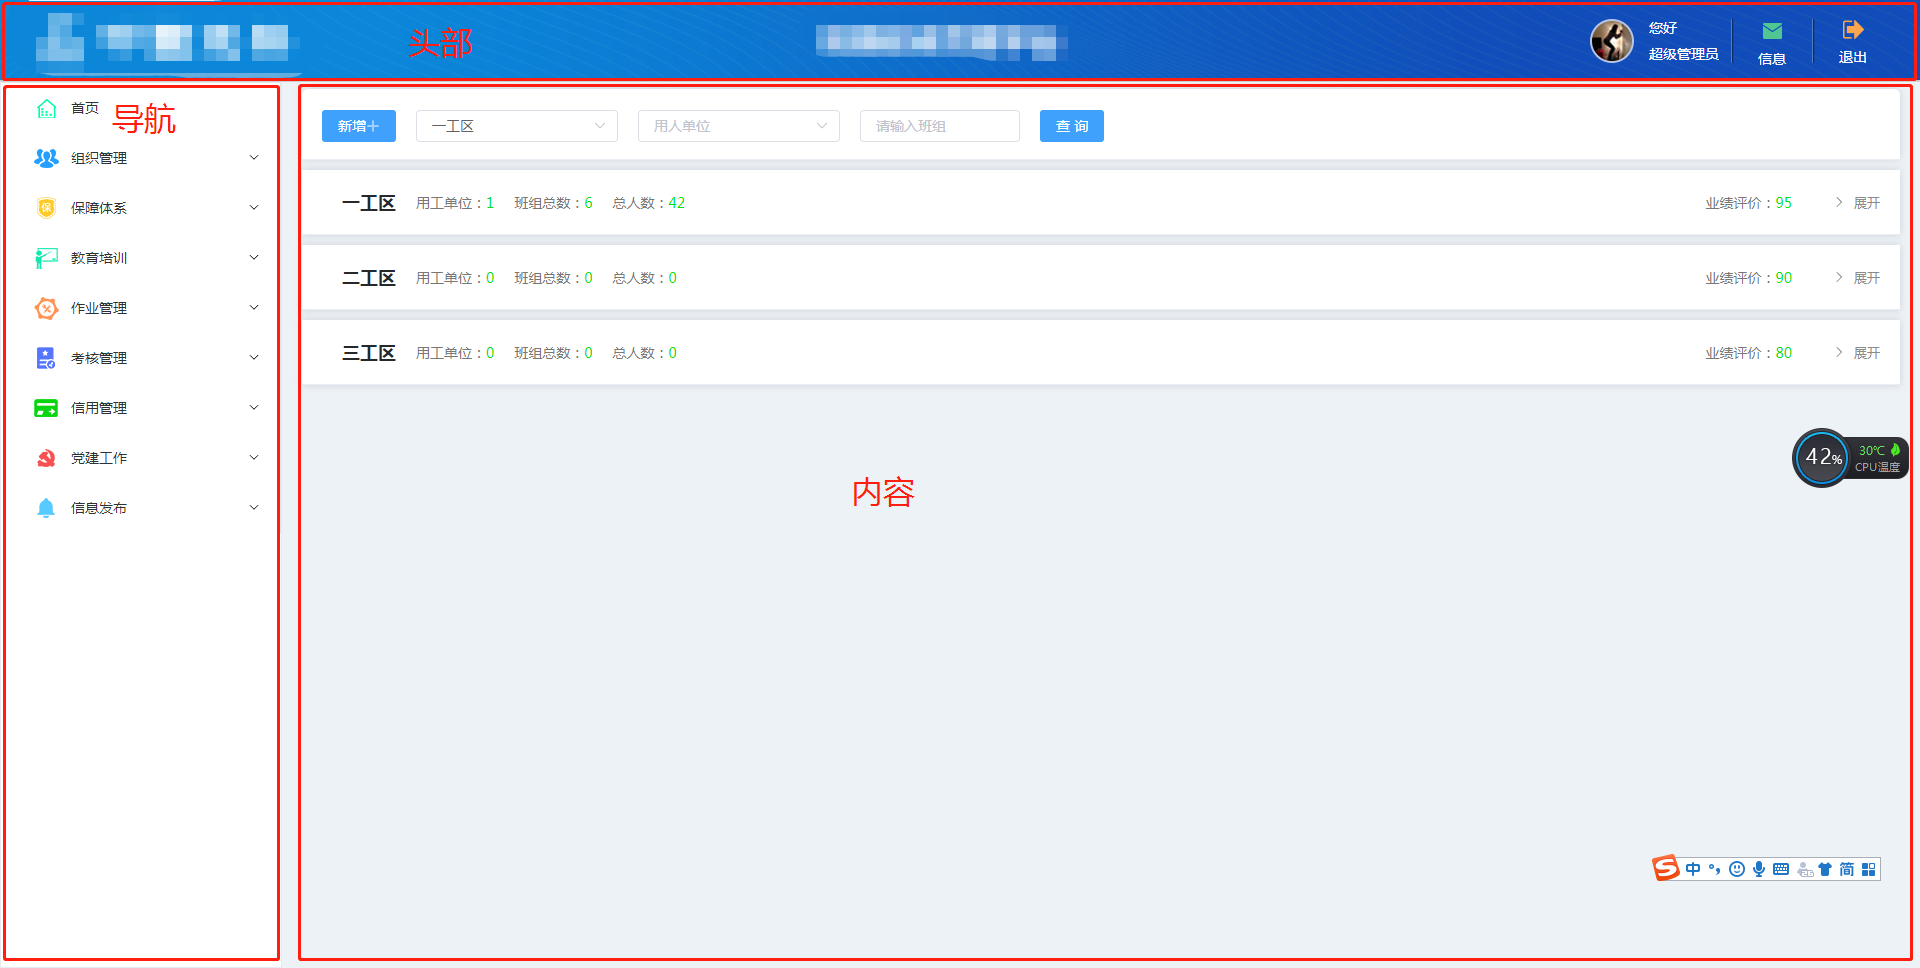
后台管理系统大多都是这个布局
 也就是很多页面都会公用一个布局,也可能有其他的布局,所以App组件中不适合直接写布局代码。我们采用二级路由的方式,一级路由的组件指向布局组件,二级路由组件指向中间内容部分的页面。
# Layout.vue
Layout组件包含三个部分,头部,导航区域,内容区域
<template>
    <div class="layout">
        <!--头部区域-->
        <div class="header-container">
            <page-header></page-header>
        </div>
        <div class="main-container">
            <!--导航区域-->
            <div class="nav-container">
                <page-nav></page-nav>
            </div>
            <!--内容区域-->
            <div class="page-container">
                <router-view></router-view>
            </div>
        </div>
    </div>
</template>
2
3
4
5
6
7
8
9
10
11
12
13
14
15
16
17
18
头部区域没什么好说的,普普通通。导航区域后面再讲,中间的内容区域用<router-view>显示二级路由的组件。
# 侧边栏
侧边栏不能写死成两级,因为可能会出现三级四级的,虽然这样很麻烦。。但是也不是不可能。
因此我把侧边栏分成两个部分:
- 列表
即有子集的菜单,这个列表可以嵌套自身达到递归的效果 - 菜单
即没有子集的菜单,这个菜单不可以嵌套别的菜单了
# 首先定义侧边栏的数据结构:
const menuList = [
    {
        path: '/',    // vue-router需要的参数
        url:'/home',   // 匹配的地址,用来判定当前是哪个按钮高亮
        name: '首页',  // vue-router需要的参数,同时也是这个按钮的名称
        id:'sy',  // id,唯一标识符,以后后台查询出来的数据肯定会有的,我先加上
        type:'button', // button代表这是按钮没有下级, menu代表这是有下级的
        component: '/Layout/Layout',  // 组件的地址
        redirect: { path: "home" },  //重定向到 home
        children: [
            {
                id:'home',
                url:'/home',
                type:'button',
                path: "home",
                name: "首页",
                component: '/Home',
            }
        ]
    },
    {
        path: '/organization',
        name: '组织管理',
        id:'zzgl',
        type:'menu',
        component: '/Layout/Layout',
        children: [
            {
                url:'/organization/employingUnit',
                id:'ygdwgl',
                type:'button',
                path: "employingUnit",
                name: "用工单位管理",
                component: '/organization/employingUnit',
            },
            {
                id:'bzgl',
                url:'/organization/teamManagement',
                type:'button',
                path: "teamManagement",
                name: "班组管理",
                component: '/organization/teamManagement',
            },
            {
                id:'rrgl',
                url:'/organization/propleManagement',
                type:'button',
                path: "propleManagement",
                name: "人员管理",
                component: '/organization/propleManagement',
            }
        ]
    }
]
2
3
4
5
6
7
8
9
10
11
12
13
14
15
16
17
18
19
20
21
22
23
24
25
26
27
28
29
30
31
32
33
34
35
36
37
38
39
40
41
42
43
44
45
46
47
48
49
50
51
52
53
54
# 导航组件
使用element-plus的el-menu组件来写导航,不会的同学可以去看官网:
<template>
    <div class="nav">
        <el-scrollbar>
            <el-menu
                :default-active="defaultActive"
                unique-opened
            >
                <slide-menu
                    v-for="item in menus"
                    :key="item.id"
                    :menu="item"
                >
                </slide-menu>
            </el-menu>
        </el-scrollbar>
    </div>
</template>

<script setup>
    import {computed} from "vue"
    import {useRoute} from "vue-router"
    import SlideMenu from "./components/slideMenu.vue"
    import menus from "./menu"  //将导航的数据引入进来

    const route = useRoute()
    const defaultActive = computed(() => route.path)
</script>
2
3
4
5
6
7
8
9
10
11
12
13
14
15
16
17
18
19
20
21
22
23
24
25
26
27
其中SlideMenu是我们接下来要封装的包含自身的递归组件。
# SlideMenu组件
<template>
    <el-sub-menu
        :index="menu.id + ''"
        v-if="menu.type=='menu'"
    >
        <template #title>
            <span>{{menu.name}}</span>
        </template>
        <slide-menu
                class="child"
            v-for="child in menu.children"
            :key="child.id"
            :menu="child"
        >
        </slide-menu>
    </el-sub-menu>
    <el-menu-item
        v-else-if="menu.type == 'button'"
        :index="setIndex(menu)"
        @click="clickMenu(menu)"
     >
        <template #title>
            <span>{{menu.name}}</span>
        </template>
    </el-menu-item>
</template>

<script setup>
    import {useRouter} from "vue-router"
    import {toRefs} from "vue"

    const props = defineProps(["menu"])
    const {menu} = toRefs(props)

    const router = useRouter()
    const clickMenu = (menu) => {
        let url = menu.url
        router.push({
            path:url
        })
    }

    const setIndex = (menu) => {
        return menu.url
    }
</script>
2
3
4
5
6
7
8
9
10
11
12
13
14
15
16
17
18
19
20
21
22
23
24
25
26
27
28
29
30
31
32
33
34
35
36
37
38
39
40
41
42
43
44
45
46
通过高亮部分引用组件自身,解决了导航层级可以是多级的问题。
# vuex使用
但是菜单这样引入不太优雅,日后这个数据是后台查出来的,而且别的地方也要使用,所以我用vuex存起来。
vuex相关js都写在store文件夹中:
├── store
    ├── action.js
    ├── getters.js
    ├── mutations.js
    ├── state.js
    └── index.js
2
3
4
5
6
# index.js
首先来创建store:
import { createStore, createLogger } from 'vuex'
import state from './state'
import mutations from './mutations'
import * as getters from './getters'
import * as actions from './actions'

const debug = import.meta.env.VITE_APP_NODE_ENV !== 'prod'

export default createStore({
  state,
  getters,
  mutations,
  actions,
  strict: debug,
  plugins: debug ? [createLogger()] : [] //在测试环境调试vuex的插件
})
2
3
4
5
6
7
8
9
10
11
12
13
14
15
16
然后在main.js中使用store:
import { createApp } from 'vue'
import App from './App.vue'
import router from './router'
import store from './store'

import ElementPlus from 'element-plus'
import 'element-plus/dist/index.css'
import zhCn from "element-plus/es/locale/lang/zh-cn";

const app = createApp(App)

app
    .use(store)
    .use(router)
    .use(ElementPlus,{
        locale: zhCn,
        size: "small"
    })
    .mount('#app')
2
3
4
5
6
7
8
9
10
11
12
13
14
15
16
17
18
19
20
# state.js
接下来定义state,目前只需要左侧导航栏的数据:
const state = {
    menuList: [] //左侧导航栏
}

export default state
2
3
4
5
# mutations.js
const mutations = {
    setMenuList(state, menuList) {
        state.menuList = menuList;
    },
}

export default mutations
2
3
4
5
6
7
# actions.js
actions中封装一个获取导航栏数据的方法,从json导入只是一个临时的做法,日后应该是接口请求到的数据
export function getMenuList({commit, state}) {
    return import('../data/menuData').then(res => {
        commit('setMenuList',res.menuList)
        return res.menuList
    })
}
2
3
4
5
6
# getters.js
export const menuList = (state) => state.menuList
# 左侧导航栏使用vuex的数据
<template>
    <div class="nav">
        <el-scrollbar>
            <el-menu
                :default-active="defaultActive"
                unique-opened
            >
                <slide-menu
                    v-for="item in menus"
                    :key="item.id"
                    :menu="item"
                >
                </slide-menu>
            </el-menu>
        </el-scrollbar>
    </div>
</template>

<script setup>
    import {computed} from "vue"
    import {useRoute} from "vue-router"
    import {useStore} from "vuex"
    import SlideMenu from "./components/slideMenu.vue"

    const route = useRoute()
    const store = useStore()
    const defaultActive = computed(() => route.path)
    const menus = computed(() => store.state.menuList)
</script>
2
3
4
5
6
7
8
9
10
11
12
13
14
15
16
17
18
19
20
21
22
23
24
25
26
27
28
29
# 使用mockjs模拟数据
有时候前端会遇到写得比后端快的情况,为了不被拖进度,前端可以自行模拟一下接口和数据,这里我使用了mockjs。
mockjs通过随机数据,模拟各种场景。 开发无侵入 不需要修改既有代码,就可以拦截 Ajax 请求,返回模拟的响应数据。
// src/mock/index.js
import Mock from 'mockjs'
import { menuList } from './menuData.js'

// 可以设置响应的时间,模拟网络耗时,单位是ms
Mock.setup({
    timeout: '200 - 400'
})

// 获取menu数据
// 参数: url, 请求方式, 数据模板(可以是对象或字符串)
Mock.mock('/menu/list', 'get', menuList)
2
3
4
5
6
7
8
9
10
11
12
然后在main.js中引入./mock/index.js。
就可以在actions.js中把获取导航栏数据改成接口获取形式。
import {http} from '@/utils/request' //自己封装的axios方法,太简单了不赘述

export function getMenuList({commit, state}) {
    return http.get('/menu/list').then(res => {
        commit('setMenuList',res)
        return res
    })
}
2
3
4
5
6
7
8
算了还是赘述一下
// utils/request.js
import axios from 'axios'
import { ElMessage } from 'element-plus'
import { getToken } from '@/utils/auth'
import store from '@/store'
import router from '@/router'

/**
* 例如 http://192.168.0.107:180/DISKSERVICE/*****
* baseUrl: http://192.168.0.107:180 即协议主机地址加端口号
* baseAPI:  DISKSERVICE 微服务的服务名
*/
function packAxios( baseUrl = "",baseAPI = ""){
    const url = (baseAPI||import.meta.env.VITE_APP_BASE_API)+"/"+baseUrl
    let tempAxios = axios.create({
        baseURL: url,
        timeout:5000
    })
    tempAxios.interceptors.request.use(config => {
        config.headers['Authorization'] = getToken()
        config.headers['Content-Type'] = 'application/json;charset=utf-8';

        //处理一下直接拼接在url后的参数
        config.url = encodeURI(config.url)
        config.url = config.url.replace(new RegExp(/(#)/g),encodeURIComponent('#'))
        config.url = config.url.replace(new RegExp(/\+/g),encodeURIComponent('+'))

        return config
    }, error => {
        Promise.reject(error)
    })
    tempAxios.interceptors.response.use(response => {
        return response.data||{}
    }, error => {
        return Promise.reject(error)
    })
    return tempAxios
}

const http = packAxios() //这里后端用微服务就可以随意更改服务地址了

export {
    http
}
2
3
4
5
6
7
8
9
10
11
12
13
14
15
16
17
18
19
20
21
22
23
24
25
26
27
28
29
30
31
32
33
34
35
36
37
38
39
40
41
42
43
44
# 动态添加路由
现在获取动态路由及菜单的方法写好了,但是还没有地方调用这个方法。我的思路是这样的:
在路由的beforeEach守卫中判断store里的menuList的长度,如果长度为0,就触发actions的getMenuList方法,将返回的数据添加到store中,然后再动态的添加路由。
# 使用nprogress,添加路由守卫
NProgress是页面跳转是出现在浏览器顶部的进度条,用这个的原因嘛。。。。因为别人都这么用的。。我不用岂不是很过时,反正我就加上了。
新建permission.js,先把这个进度条加上
import NProgress from "nprogress";

export default {
    install: async (app, {router, store}) => {
        router.beforeEach(async (to, from, next) => {
            NProgress.start();
            next();
        })
        router.afterEach(() => {
            NProgress.done();
        });
    }
}
2
3
4
5
6
7
8
9
10
11
12
13
然后在mian.js中引入
import { createApp } from 'vue'
import App from './App.vue'
import router from './router'
import store from './store'

import ElementPlus from 'element-plus'
import zhCn from "element-plus/es/locale/lang/zh-cn";
import permission from "@/utils/permission";

import './mock/index'

const app = createApp(App)

app
    .use(store)
    .use(router)
    .use(ElementPlus,{
        locale: zhCn,
        size: "small"
    })
    .use(permission, { router, store })
    .mount('#app')
2
3
4
5
6
7
8
9
10
11
12
13
14
15
16
17
18
19
20
21
22
注意
use()方法作用是安装 Vue.js 插件。如果插件是一个对象,它必须暴露一个 install 方法。如果它本身是一个函数,它将被视为安装方法。
该安装方法将以应用实例作为第一个参数被调用。传给 use 的其他 options 参数将作为后续参数传入该安装方法。
# 请求菜单数据
然后判断一下store中menuList的长度,获取menuList的数据:
import NProgress from "nprogress";

export default {
    install: async (app, {router, store}) => {
        router.beforeEach(async (to, from, next) => {
            NProgress.start();
            if(store.state.menuList.length == 0) {
                //请求菜单栏数据
                const menuList = await store.dispatch('getMenuList')
            }
            next();
        })
        router.afterEach(() => {
            NProgress.done();
        });
    }
}
2
3
4
5
6
7
8
9
10
11
12
13
14
15
16
17
现在store中有导航栏数据了,侧边栏的渲染也没问题了,但是页面还不能跳转,因为没有添加路由。
# 动态添加路由
vue2.x的时候动态添加路由我一直用的addRoutes,但是这回直接用报错了,查过之后才知道最新版本的vue-router把这个方法移除了,现在都用addRoute。
因为是用vite,所以menuList需要处理一下,添加两个公共方法:
export function calcMenuList(menuList) {
    menuList.forEach(item => {
        if(item.children && item.children.length > 0){
            calcMenu(item)
            //遇到有子路由的递归
            calcMenuList(item.children)
        }else{
            calcMenu(item)
        }
    })
    return menuList
}

//vite批量引入views下的vue组件
const modules = import.meta.globEager('../views/**/*.vue')
function calcMenu(menu){
    const url = '../views'+menu.component+'.vue'
    const file = modules[url].default
    menu.component = file
}
2
3
4
5
6
7
8
9
10
11
12
13
14
15
16
17
18
19
20
现在vue-router需要的数据就改造成功了~我们来添加路由吧:
import NProgress from "nprogress";
import {calcMenuList} from '@/utils/common'

export default {
    install: async (app, {router, store}) => {
        router.beforeEach(async (to, from, next) => {
            NProgress.start();
            if(store.state.menuList.length == 0) {
                //请求菜单栏数据
                const menuList = await store.dispatch('getMenuList')
                const menus = calcMenuList(menuList)
                //添加路由
                for(let x of menus){
                    router.addRoute(x)
                }
                next({...to,replace: true});
            }
            next();
        })
        router.afterEach(() => {
            NProgress.done();
        });
    }
}
2
3
4
5
6
7
8
9
10
11
12
13
14
15
16
17
18
19
20
21
22
23
24
添加完路由后就会自动跳转到第一个页面。
# 使用element-plus以及修改样式
element-plus的组件固然好用,但是UI设计师们有自己的想法,那么该怎么改element-plus的样式呢?其实官网上说得很清楚了。我复述一下。
# 原理
element-plus的theme-chalk使用SCSS编写而成。你可以在packages/theme-chalk/src/common/var.scss文件中查找SCSS变量。
注意
我们使用 sass 模块(sass:map...)来重构所有的 SCSS 变量。
例如, 使用$colors变量映射不同颜色。
$notification 是所有notification 组件的变量的映射。
未来,我们将为每个组件的自定义变量编写文档。 你也可以直接查看源代码 var.scss
# 实践
新建_var.scss:
@forward "element-plus/theme-chalk/src/common/var.scss" with (
  $colors: (
    'primary': (
      'base': #3FA1FC,
    ),
  ),
  $font-size:(
    'extra-large': 20px,
    'large': 18px,
    'medium': 16px,
    'base': 14px,
    'small': 14px,
    'extra-small': 12px,
  ),
  $collapse: (
      'header-height': auto
  ),
  $table: (
    'font-color': #0A1222,
    'header-font-color': #0A1222,
    'header-background-color': #F0F0F0
  ),
  $dialog:(
    'width': 50%,
    'margin-top': 97px,
    'box-shadow': 0px 0px 8px 0px rgba(202, 206, 213, 0.91),
    'title-font-size': 20px,
    'content-font-size': 14px,
    'padding-primary': 20px,
  )
);
2
3
4
5
6
7
8
9
10
11
12
13
14
15
16
17
18
19
20
21
22
23
24
25
26
27
28
29
30
31
这里改了一些定义好的scss变量。
注意
开头是下划线 _ 的文件,sass不会打包成单独的文件,但是引用的时候可以直接用var.scss
但是dialog组件还是不太符合需求,所以新建_dialog.scss:
.el-dialog__header{
  padding:20px;
  font-weight: bold;
  background: #EDF2F6;
  border-radius: 6px 6px 0 0;
  .el-dialog__title{
    color:#62798A;
  }
  .el-dialog__headerbtn{
    font-size:25px;
  }
}
.el-dialog__footer{
  text-align: center;
}
.el-dialog{
  border-radius: 6px;
  margin-bottom:0;
}
.el-dialog__body{
  padding:0;
  max-height: calc(100vh - 250px);
  overflow: auto;
}
2
3
4
5
6
7
8
9
10
11
12
13
14
15
16
17
18
19
20
21
22
23
24
可以更加细致的自定义一些样式,其他的组件想要改样式也建议这样改
新建index.scss并在main.js中引入:
@use "./var.scss" as *;
@use "element-plus/theme-chalk/src/index.scss" as *;
@use "./dialog.scss";
2
3
再刷新一下页面看,样式就改完啦。
# 在页面中嵌套iframe
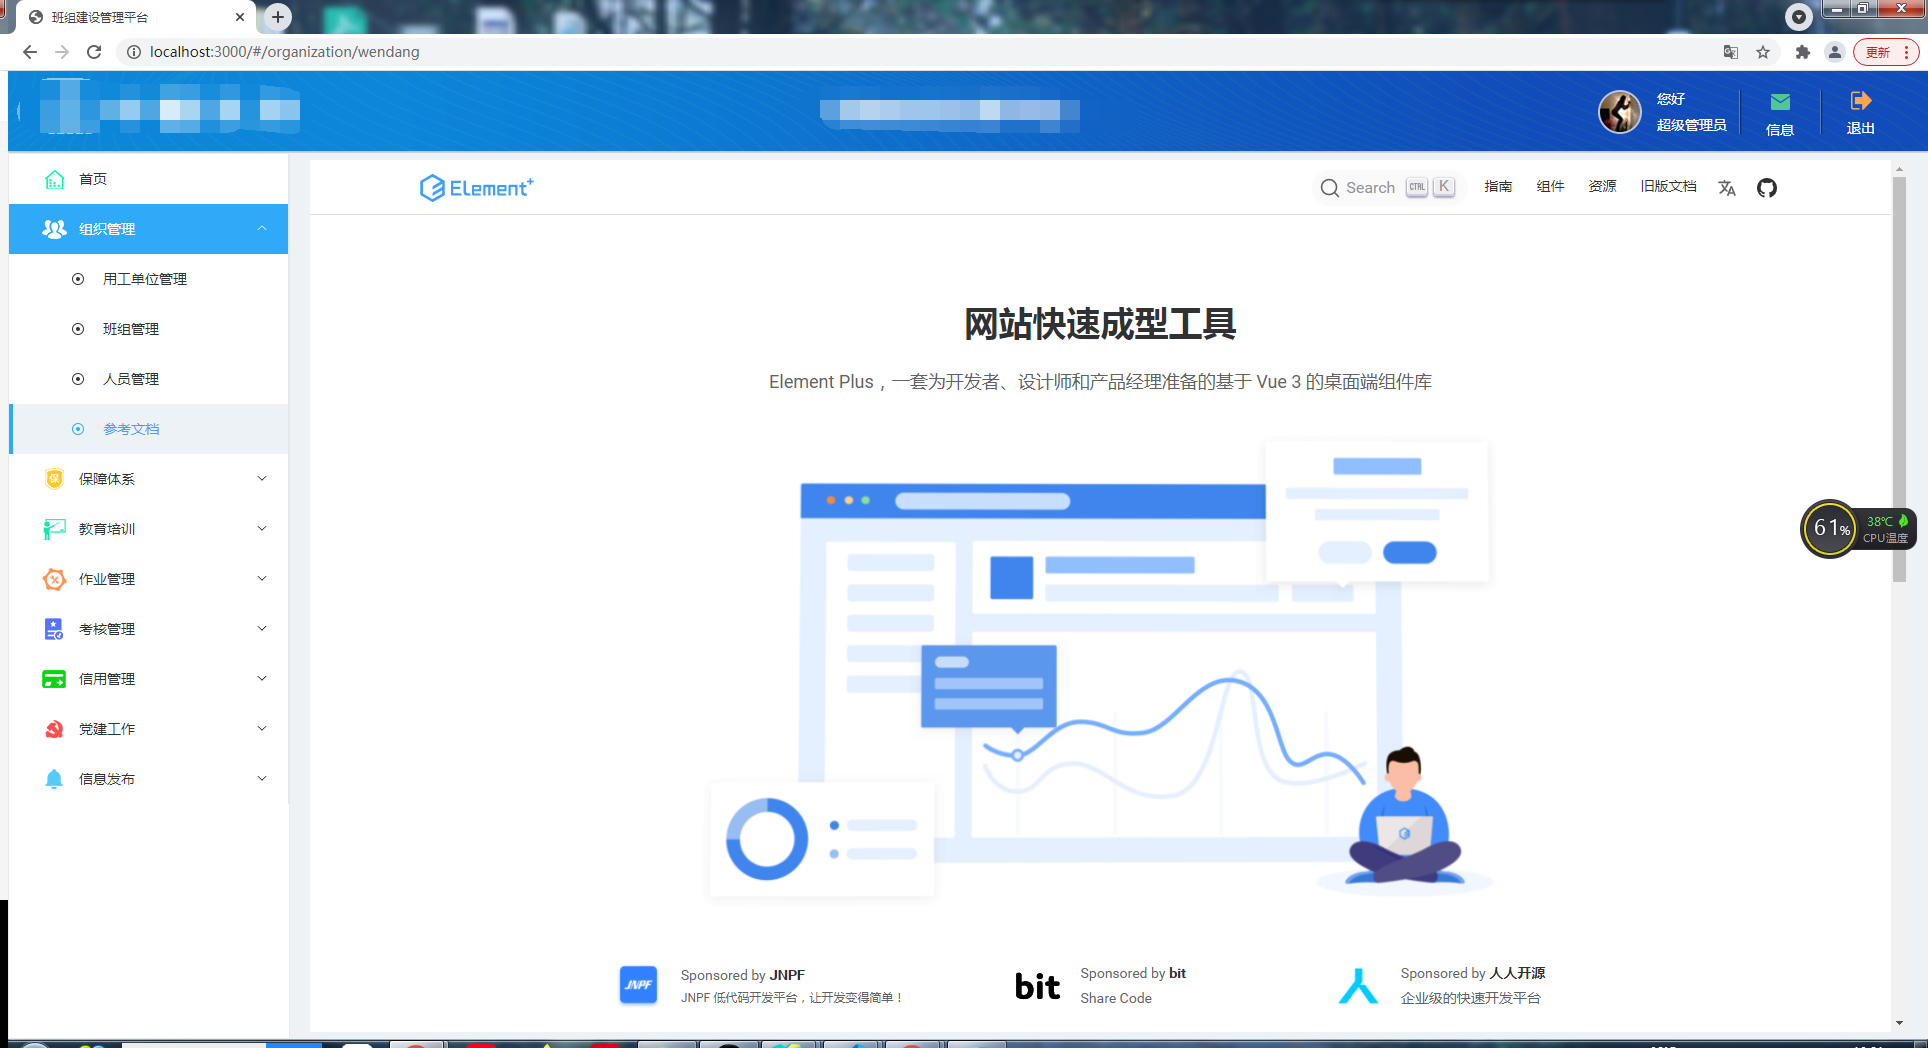
如果系统里想嵌套别的页面怎么办,可以用iframe,效果嘛如下:

思路:在Layout文件夹下新建Iframe.vue,这个页面用来加载iframe,路由的props传递要加载的url,路由的components指向Iframe.vue就好啦。
先写Iframe.vue:
<template>
    <!-- v-loading是element-plus的指令,用来实现加载中的遮罩效果 -->
    <div
        class="iframe-wrapper"
        v-loading="load"
        element-loading-text="加载中"
    >
        <iframe ref="iframe" :src="props.url" frameborder="0"></iframe>
    </div>
</template>

<script setup>
import {defineProps, onMounted, ref} from "vue"

const props = defineProps({
    url: {type: String}
})
const load = ref(true)
const iframe = ref(null)

const setLoad = () => {
    const $onLoad = () => {
        load.value = false
    }
    //这里主要是为了兼容ie
    if (iframe.value.attachEvent) {
        iframe.value.attachEvent("onload", $onLoad)
    } else {
        iframe.value.onload = $onLoad
    }
}

onMounted(() => {
    setLoad()
})

</script>

<style lang="scss" scoped>
iframe, .iframe-wrapper {
    width:100%;
    height:100%;
}
</style>
2
3
4
5
6
7
8
9
10
11
12
13
14
15
16
17
18
19
20
21
22
23
24
25
26
27
28
29
30
31
32
33
34
35
36
37
38
39
40
41
42
43
44
然后导航栏数据加上一条参考文档,component为iframe要加载的地址:
const menuList = [
    //...
    {
        path: '/organization',
        name: '组织管理',
        id:'zzgl',
        icon:'zzgl',
        type:'menu',
        component: '/Layout/Layout',
        children: [
            //...
            {
                id:'wd',
                icon:'circle',
                url:'/organization/wendang',
                type:'button',
                path: "wendang",
                name: "参考文档",
                component: 'https://element-plus.gitee.io/zh-CN/',
            }
        ]
    }
    //...
]
2
3
4
5
6
7
8
9
10
11
12
13
14
15
16
17
18
19
20
21
22
23
24
最后common.js中的calcMenu方法修改一下,如果component的地址开头为http或者https,就将模板替换为Iframe.vue,同时route传递含有url的props:
//common.js

//...
const modules = import.meta.globEager('../views/**/*.vue')
function calcMenu(menu){
    if(testUrlHead(menu.component)){
        const url = '../views/Layout/Iframe.vue'
        const file = modules[url].default
        menu.props = {url:menu.component}
        menu.component = file
    }else {
        const url = '../views' + menu.component + '.vue'
        const file = modules[url].default
        menu.component = file
    }
}

function testUrlHead(str) {
    const reg = /^(http)|(https)/
    return str.match(reg)
}
2
3
4
5
6
7
8
9
10
11
12
13
14
15
16
17
18
19
20
21
22
# 封装no-data组件和指令
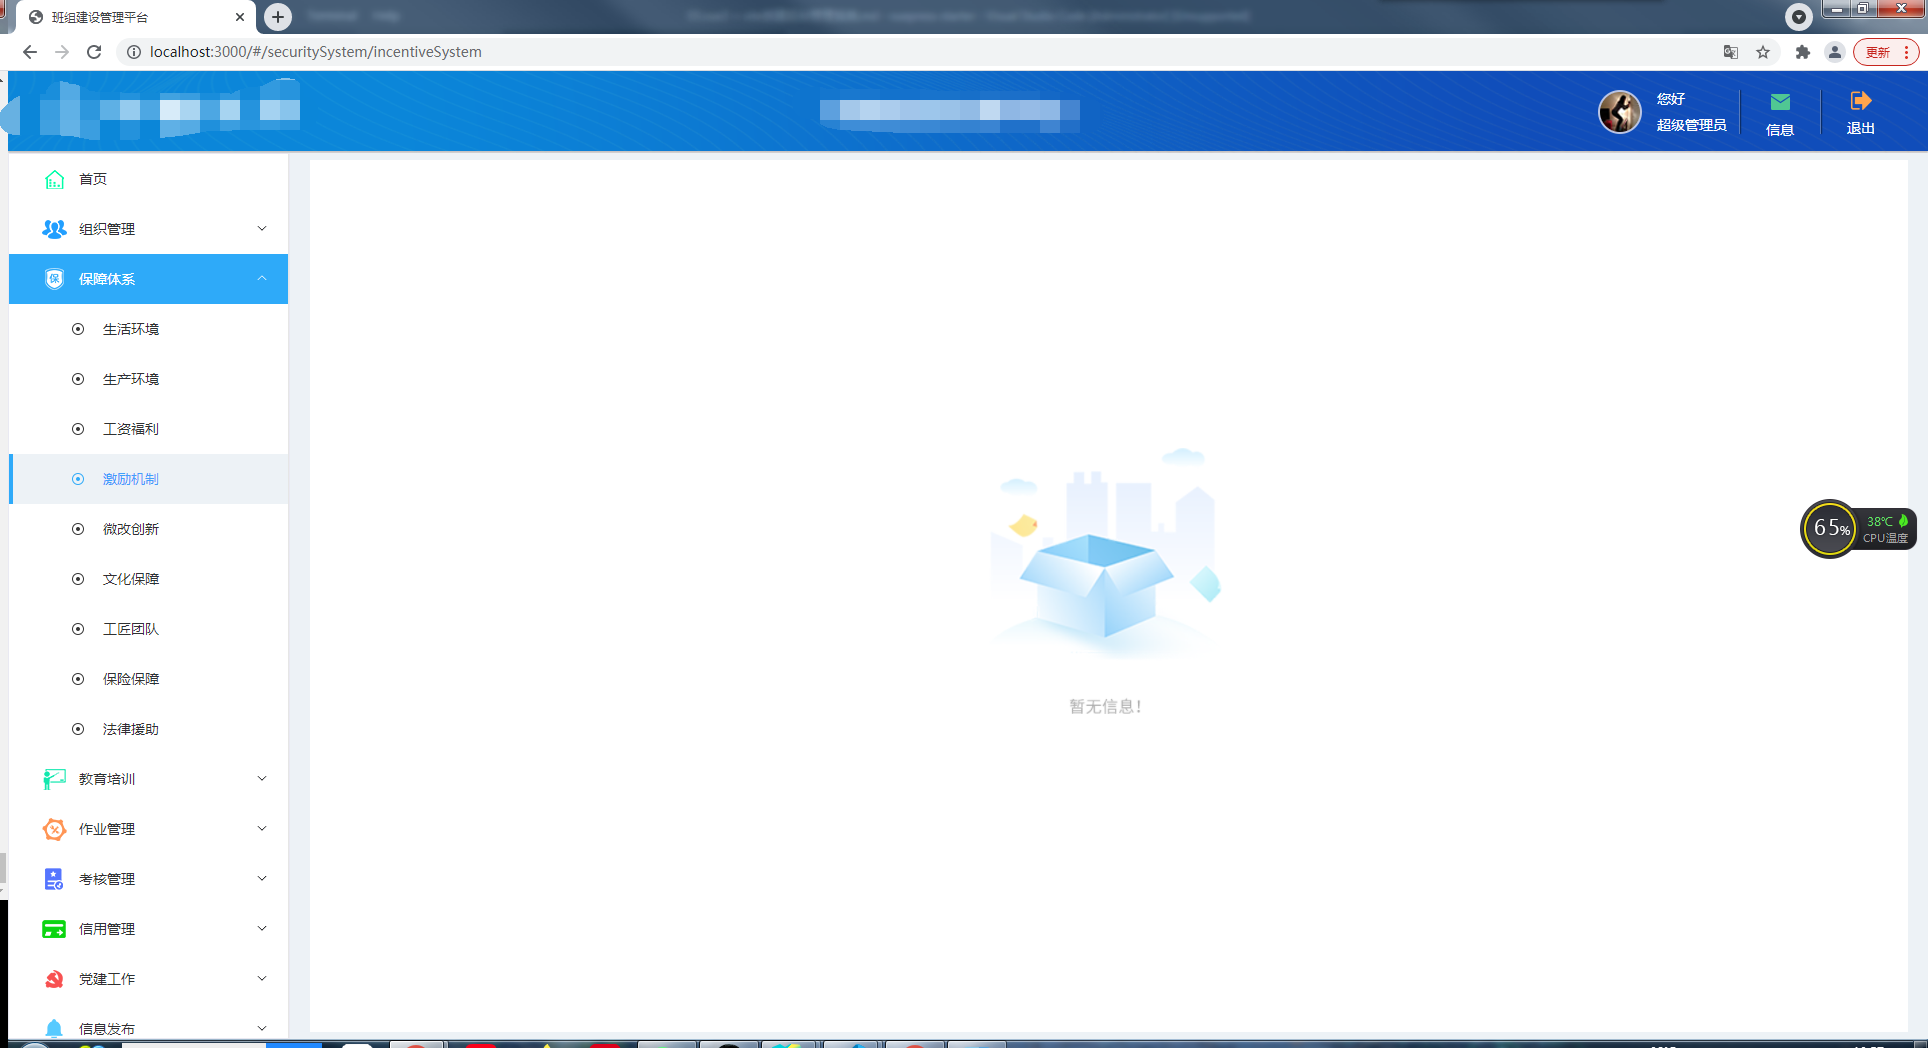
后台系统肯定会有一些异常状态,比如说表格没数据啊,某个页面还没开发呀之类的,一般都会封装一个no-data组件表示当前没有数据,我也封装了一个,效果如下:

# 封装no-data组件
这个组件本身还是很容易的,就一张图片居中,props传入想要的文案:
// noData.vue
<template>
    <div class="no-data">
        <div class="no-data-content">
            <div class="icon"></div>
            <p class="text">{{title}}</p>
        </div>
    </div>
</template>

<script>
    export default {
        name:'no-data',
        props:{
            title:{
                type:String,
                default:'暂无数据'
            }
        }
    }
</script>

<style lang="scss" scoped>
    .no-data {
        position:absolute;
        top: 50%;
        left: 50%;
        transform: translate3d(-50%, -50%, 0);
        .no-data-content {
            text-align: center;
            .icon {
                width:250px;
                height:266px;
                margin: 0 auto;
                background: url("../../assets/img/noData.png");
                background-size: 250px 266px;
            }
            .text {
                margin-top: 30px;
                font-size: 14px;
                color:#333;
            }
        }
    }
</style>
2
3
4
5
6
7
8
9
10
11
12
13
14
15
16
17
18
19
20
21
22
23
24
25
26
27
28
29
30
31
32
33
34
35
36
37
38
39
40
41
42
43
44
45
但是这样每次用都要引入组件使用组件,写出很多并不好看的代码来,能不能像element-plus的v-loading一样呢?只要一个v-no-data指令,传入true就显示no-data组件的东西。
# 封装指令
需要把一个组件显示在某个div中的这种行为还挺常见的,以后肯定会封装出一系列差不多的指令出来,所以为了减少重复代码~先写一个封装指令的方法~
// utils/createDirectiveByComponent.js
import {createApp} from 'vue'
//这两个就是添加class和移除class的方法,不赘述
import {addClass, removeClass} from './common.js'

//这个class是给元素赋予position:relative的
const relativeCls = 'g-relative'

export default function createDirectiveByComponent(Comp) {
    return {
        mounted(el, binding) {
            // 实例化Comp组件
            const app = createApp(Comp)
            // 将实例挂载到一个div上
            const instance = app.mount(document.createElement('div'))
            // 获取这个组件的名字
            const name = Comp.name
            // 因为el上可能不止绑定了一个指令,所以需要根据名字来区分一下
            if (!el[name]) {
                el[name] = {}
            }
            // 将实例存在el[name].instance上,因为instance在append和remove方法上访问不到
            el[name].instance = instance
            // 获取指令传入的参数
            const title = binding.arg
            if(typeof title !== 'undefined') {
                instance.setTitle(title)
            }
            //如果指令绑定的值是true,就把instance添加到el上
            if(binding.value) {
                append(el)
            }
        },
        updated(el, binding) {
            const title = binding.arg
            const name = Comp.name
            // 指令传参改变就变一下标题
            if(typeof title != 'undefined') {
                el[name].instance.setTitle(title)
            }
            // 如果指令绑定值为true就添加元素,如果是false就删除
            if(binding.value !== binding.oldValue) {
                binding.value ? append(el) :remove(el)
            }
        }
    }

    function append(el) {
        const name = Comp.name
        const style = getComputedStyle(el)
        if(['absolute','fixed','relative'].indexOf(style.position) === -1) {
            addClass(el, relativeCls)
        }
        el.appendChild(el[name].instance.$el)
    }
    function remove(el) {
        const name = Comp.name
        removeClass(el, relativeCls)
        el.removeChild(el[name].instance.$el)
    }
}
2
3
4
5
6
7
8
9
10
11
12
13
14
15
16
17
18
19
20
21
22
23
24
25
26
27
28
29
30
31
32
33
34
35
36
37
38
39
40
41
42
43
44
45
46
47
48
49
50
51
52
53
54
55
56
57
58
59
60
61
62
然后创建no-data指令就容易了:
// components/noData/noDataDirective.js

import NoData from './noData.vue'
import createDirectiveByComponent from '@/utils/createDirectiveByComponent.js'

const noDataDirective = createDirectiveByComponent(NoData)

export default noDataDirective
2
3
4
5
6
7
8
然后在main.js中注册一下指令:
import { createApp } from 'vue'
import App from './App.vue'
import router from './router'
import store from './store'

import '@/style/element/index.scss'
import "nprogress/nprogress.css";
import ElementPlus from 'element-plus'
import zhCn from "element-plus/es/locale/lang/zh-cn";
import permission from "@/utils/permission";

import './mock/index'

import noDataDirective from "@/components/noData/noDataDirective.js"

const app = createApp(App)

app
    .use(store)
    .use(router)
    .use(ElementPlus,{
        locale: zhCn,
        size: "small"
    })
    .use(permission, { router, store })
    .directive('no-data', noDataDirective)
    .mount('#app')
2
3
4
5
6
7
8
9
10
11
12
13
14
15
16
17
18
19
20
21
22
23
24
25
26
27
28
再适当改造一下no-data组件:
<template>
    <div class="no-data">
        <div class="no-data-content">
            <div class="icon"></div>
            <p class="text">{{title}}</p>
        </div>
    </div>
</template>

<script>
    export default {
        name:'no-data',
        data(){
            return {
                title:'暂无数据'
            }
        },
        methods: {
            setTitle(title) {
                this.title = title
            }
        }
    }
</script>

//....
2
3
4
5
6
7
8
9
10
11
12
13
14
15
16
17
18
19
20
21
22
23
24
25
26
现在就可以使用no-data指令了:
<div v-no-data:[text]="true">
</div>

//...
const text = ref('哼,就是没有数据')
2
3
4
5
