
MCP与A2A的应用
更新时间: 2026-04-02 09:27:41
# 什么是MCP
Model Context Protocol (MCP)是由Anthropic公司于2024年11月推出的一种开放协议标准,目的在于标准化 LLM与外部数据源、工具及服务之间的交互方式。MCP被广泛类比为“AI领域的USB-C接口”
# MCP与Function Calling的区别
| 类别 | MCP (Model Context Protocol) | Function Calling |
|---|---|---|
| 性质 | 协议 | 功能 |
| 范围 | 通用(多数据源、多功能) | 特定场景(单一数据源或功能) |
| 目标 | 统一接口,实现互操作 | 扩展模型能力 |
| 实现 | 基于标准协议 | 依赖于特定模型实现 |
| 开发复杂度 | 低:通过统一协议实现多源兼容 | 高:需要为每个任务单独开发函数 |
| 复用性 | 高:一次开发,可多场景使用 | 低:函数通常为特定任务设计 |
| 灵活性 | 高:支持动态适配和扩展 | 低:功能扩展需要额外开发 |
| 常见场景 | 复杂场景,如跨平台数据访问与整合 | 简单任务,如天气查询、商品推荐等 |
# MCP的核心概念
- 架构与组件 MCP采用客户端-服务器(Client-Server)架构,主要包括以下核心组件:
- MCP Host:运行AI模型的环境,如Claude Desktop、Cursor IDE等。
- MCP Client:嵌入在Host中的组件,负责发起请求并与MCP Server通信。
- MCP Server:轻量级服务,提供特定功能(如数据查询、API调用等),供AI模型调用。
- 核心功能
MCP提供三种关键能力:
•Resources(知识扩展):提供结构化数据(如数据库、文档)以增强AI的上下文理解。
•Tools(工具调用):允许AI执行外部操作(如发送邮件、查询GitHub、调用智能合约等)。
•Prompts(提示模板):预定义的指令模板,优化AI的任务执行。
# MCP的使用场景
- 增强AI的实时性与执行能力
- 实时数据访问:MCP允许AI访问最新数据(如股票行情、新闻),而非仅依赖训练时的静态数据。
- 自动化任务:AI可通过MCP直接执行任务,如整理文件、发送邮件、管理代码仓库等。
- 区块链交互:MCP可集成以太坊智能合约,让用户通过自然语言完成链上操作(如DeFi交易)。
- 去中心化AI生态
- 创作者经济:个人或企业可搭建MCP Server提供特定服务(如鸟类知识库),并通过调用次数获得收益。
- 抗审查与去中心化:MCP使AI能力分散在多个Server上,减少大公司垄断风险。
- 开发者工具
- 简化集成:MCP标准化了AI与外部系统的交互,开发者无需为每个数据源编写定制API。
- 多模态支持:MCP可整合语音、图像、传感器数据等,使AI具备更全面的环境感知能力
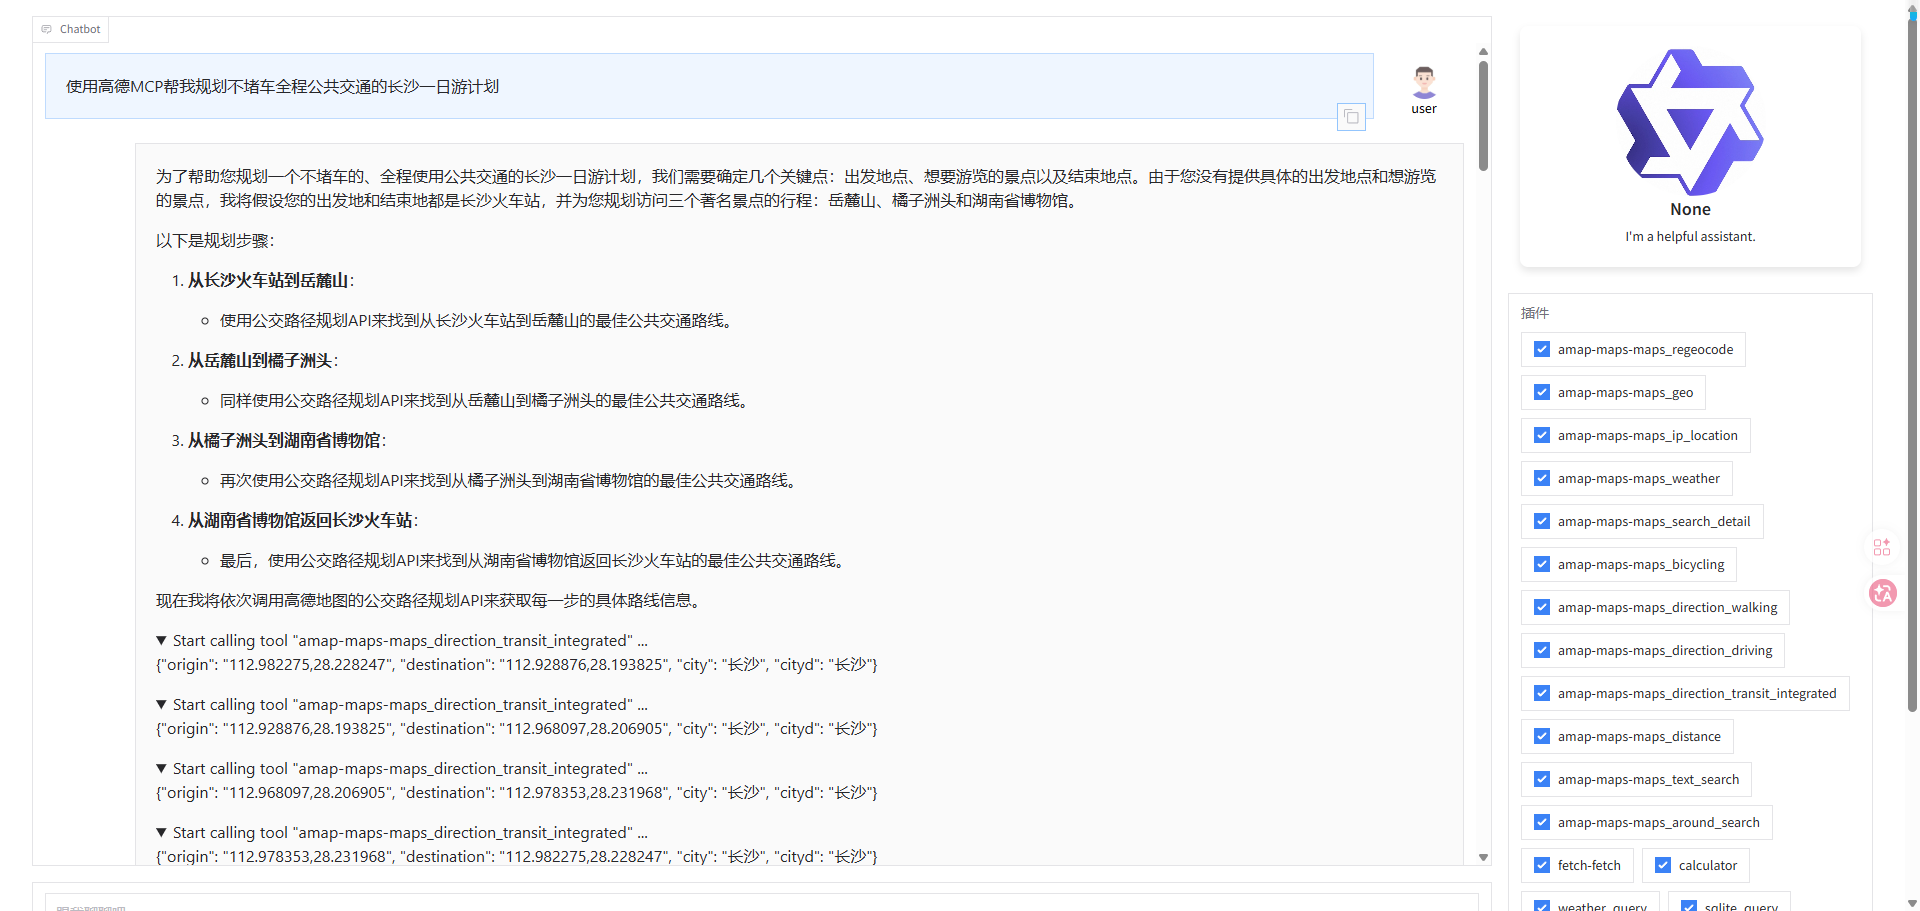
# CASE:旅游攻略MCP
- 获取高德地图MCP的使用授权(免费)https://lbs.amap.com/
- 注册成为开发者=>创建应用=>应用服务平台选择Web服务=>获取API KEY
- 去魔塔社区获取高德MCP的配置
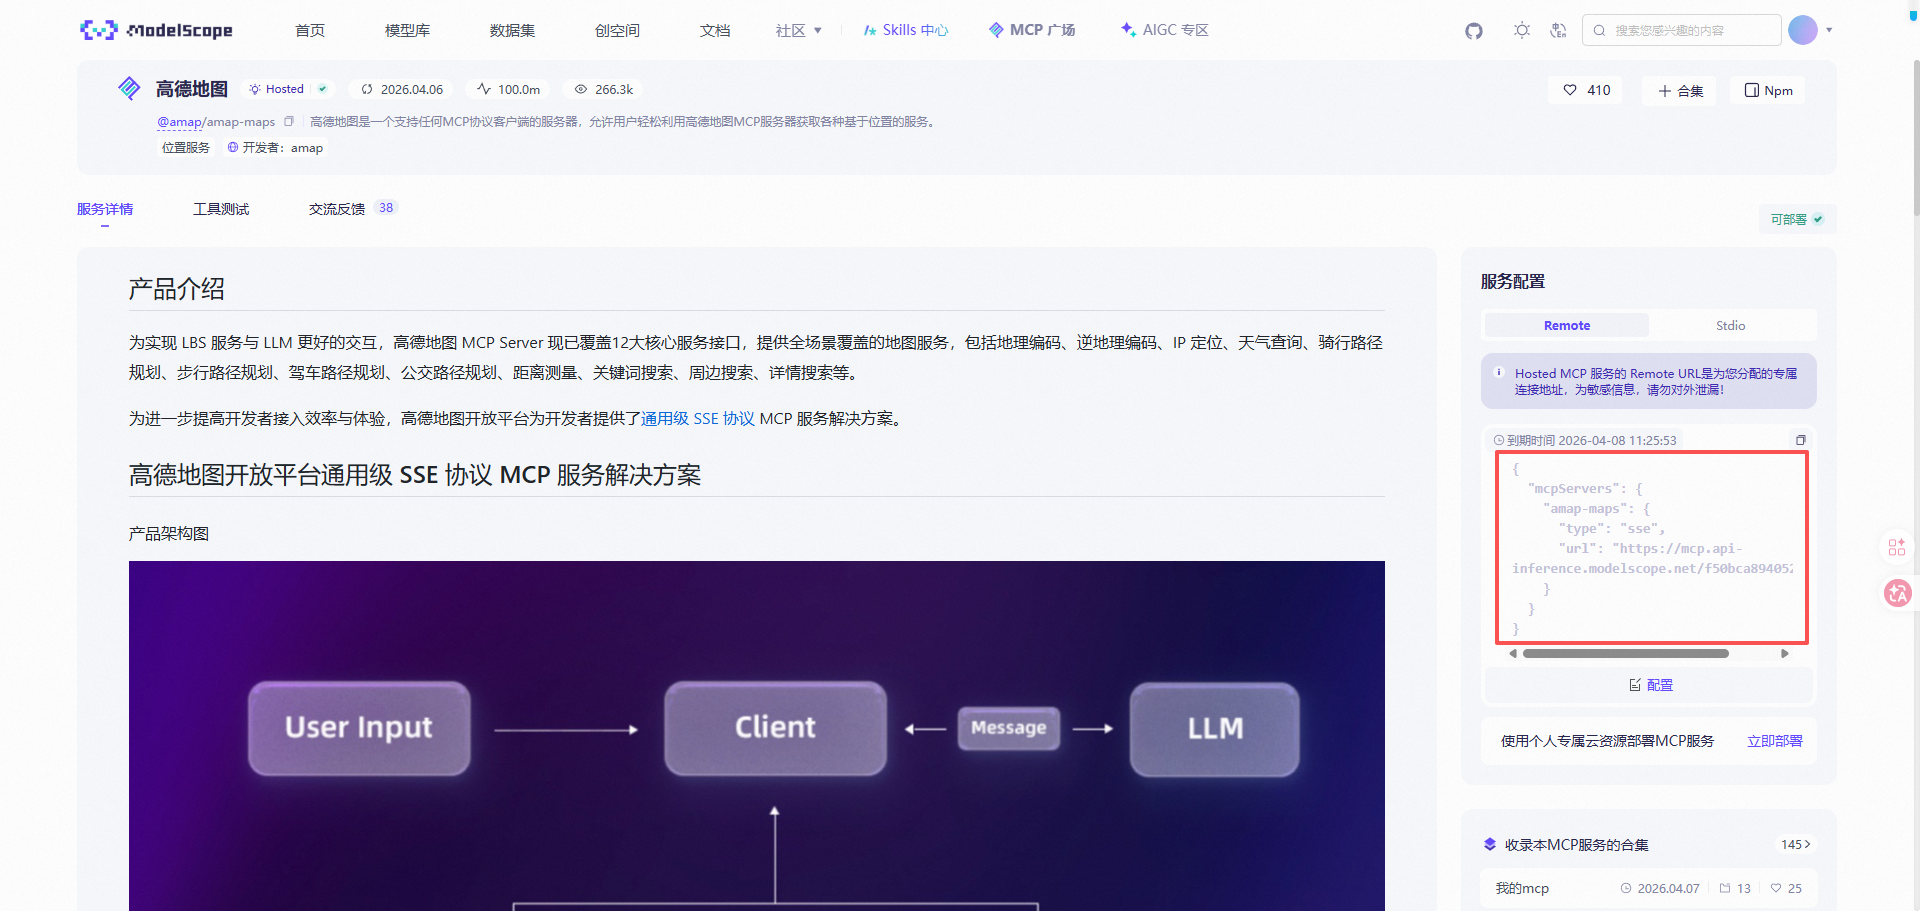
- 在代码中配置
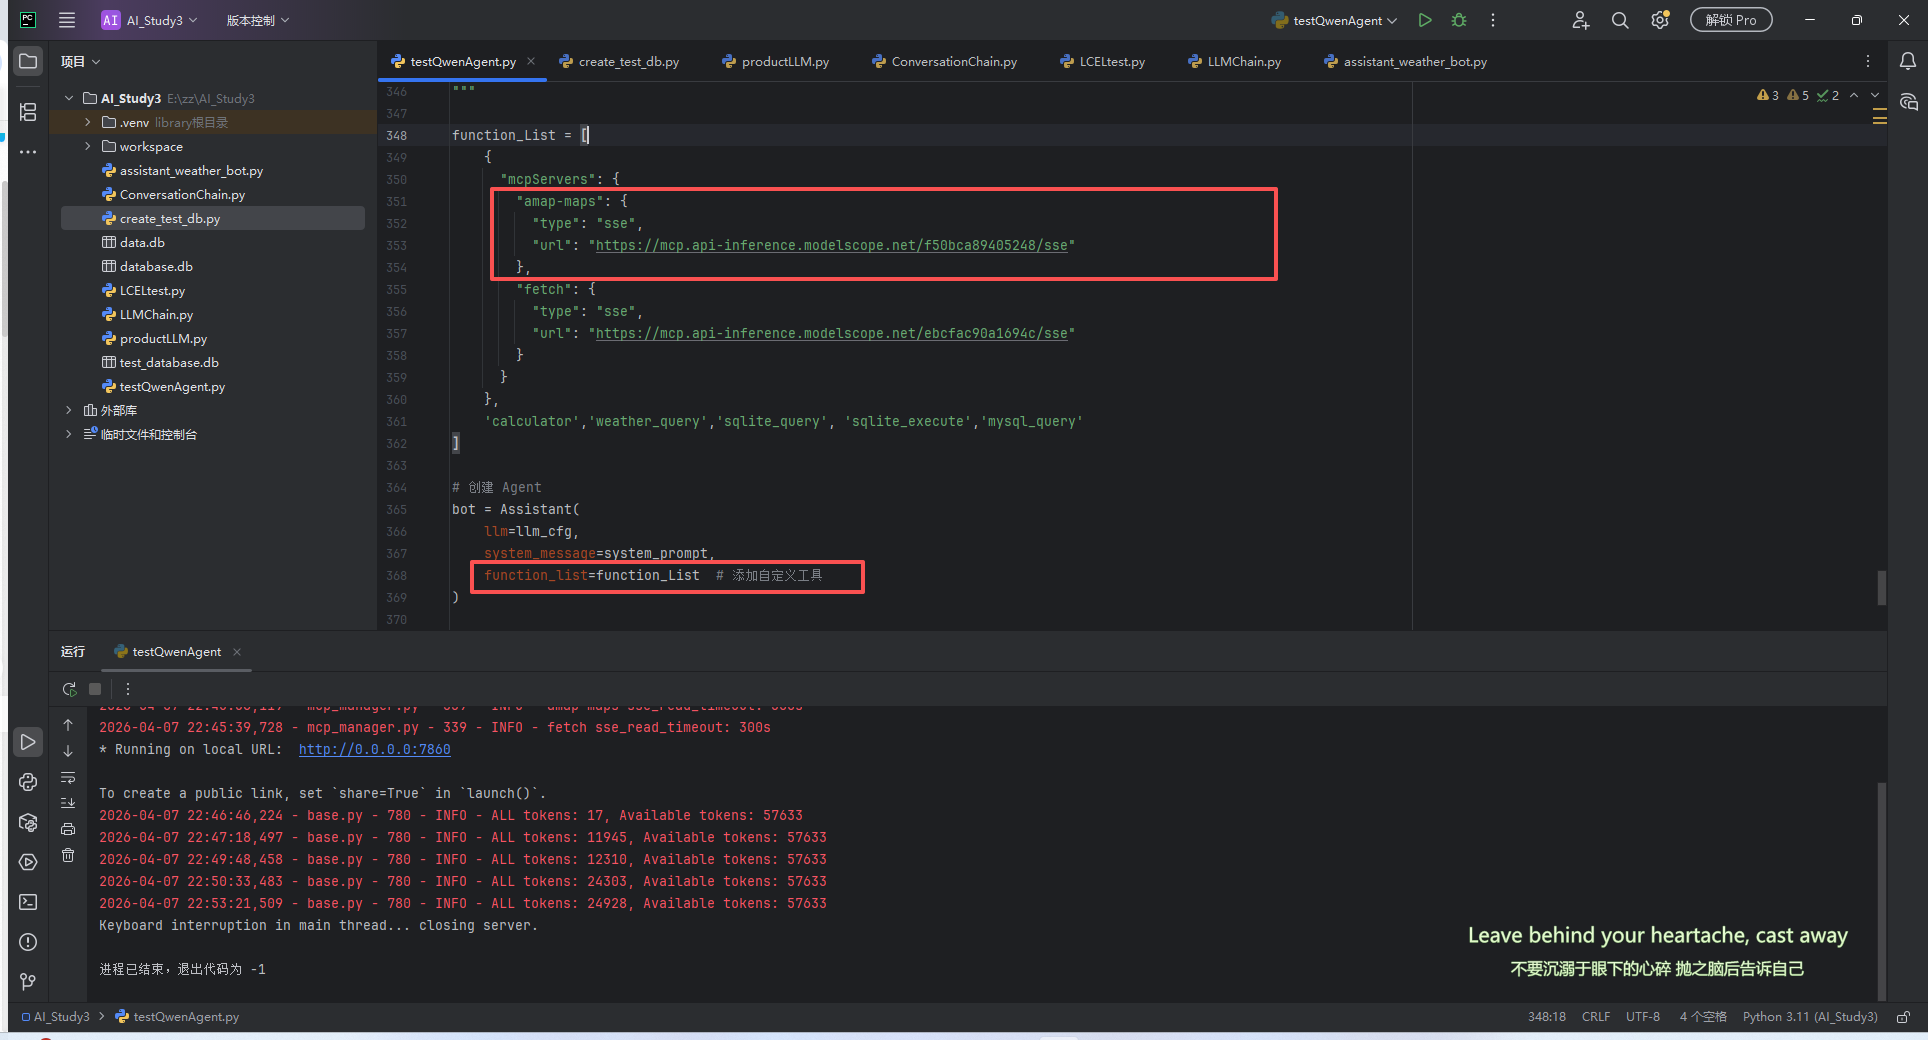
- 然后就可以使用了
# 自己开发MCP
# 第一步:理解MCP的核心结构
写一个MCP工具,本质上就三件事:
- 创建一个Server实例 - 这是你的MCP服务器
- 定义工具 - 告诉AI你这个工具叫什么、干嘛用、需要什么参数
- 实现工具逻辑 - 当AI调用这个工具时,真正执行的代码
用Python写的话,最简单的骨架是这样的:
from mcp.server import Server
from mcp.server.stdio import stdio_server

# 1. 创建服务器实例
server = Server("我的服务器名字")

# 2. 定义工具(待会儿写)
# ...

# 3. 实现工具逻辑(待会儿写)
# ...

# 4. 启动服务器
async def main():
    async with stdio_server() as (read, write):
        await server.run(read, write, server.create_initialization_options())

if __name__ == "__main__":
    import asyncio
    asyncio.run(main())
1
2
3
4
5
6
7
8
9
10
11
12
13
14
15
16
17
18
19
20
2
3
4
5
6
7
8
9
10
11
12
13
14
15
16
17
18
19
20
这个骨架里,你真正要写的只有第2步和第3步,其他都是固定套路。
第2步用装饰器 @server.list_tools() 来定义工具。
第3步用装饰器 @server.call_tool() 来实现逻辑。
# 第二步:定义工具(告诉AI这个工具干嘛用)
我们要写一个密码生成器,先想清楚它需要什么参数:
- length: 密码长度(比如8位、16位)
- include_uppercase: 是否包含大写字母(A-Z)
- include_lowercase: 是否包含小写字母
- 有的需要数字(0-9)
- 有的需要特殊字符(!@#$%等)
好,那定义工具的代码是这样:
from mcp.types import Tool

@server.list_tools()
async def list_tools() -> list[Tool]:
    return [
        Tool(
            name="generate_password",
            description="生成一个随机密码。可以指定密码长度和包含的字符类型。",
            inputSchema={
                "type": "object",
                "properties": {
                    "length": {
                        "type": "integer",
                        "description": "密码长度,默认12位",
                        "default": 12
                    },
                    "include_uppercase": {
                        "type": "boolean",
                        "description": "是否包含大写字母(A-Z)",
                        "default": True
                    },
                    "include_lowercase": {
                        "type": "boolean",
                        "description": "是否包含小写字母",
                        "default": True
                    },
                    "include_numbers": {
                        "type": "boolean",
                        "description": "是否包含数字(0-9)",
                        "default": True
                    },
                    "include_symbols": {
                        "type": "boolean",
                        "description": "是否包含特殊字符(!@#$%等)",
                        "default": False
                    }
                },
                "required": []  # 没有必填参数,因为都有默认值
            }
        )
    ]
1
2
3
4
5
6
7
8
9
10
11
12
13
14
15
16
17
18
19
20
21
22
23
24
25
26
27
28
29
30
31
32
33
34
35
36
37
38
39
40
41
2
3
4
5
6
7
8
9
10
11
12
13
14
15
16
17
18
19
20
21
22
23
24
25
26
27
28
29
30
31
32
33
34
35
36
37
38
39
40
41
这段代码的关键点
- Tool对象
- name: 工具的名字,AI调用时会用这个名字
- description: 描述,AI会根据这个描述判断什么时候该用这个工具
- inputSchema: 参数的JSON Schema,定义了这个工具需要什么参数
- inputSchema的结构
{
    "type": "object",  // 参数是一个对象
    "properties": {    // 这个对象有哪些属性
        "参数名": {
            "type": "类型",
            "description": "参数说明",
            "default": "默认值"
        }
    },
    "required": []     // 哪些参数是必填的
}
1
2
3
4
5
6
7
8
9
10
11
2
3
4
5
6
7
8
9
10
11
- 参数类型
- integer - 整数
- boolean - 布尔值
- string - 字符串
- number - 数字(包括小数)
- array - 数组
- object - 对象
# 第三步:实现工具逻辑
AI调用工具时,会触发 @server.call_tool() 这个装饰器。你需要在这个函数里写真正的逻辑。
import random
import string
from mcp.types import TextContent

@server.call_tool()
async def call_tool(name: str, arguments: dict) -> list[TextContent]:
    # 1. 判断是哪个工具被调用了
    if name == "generate_password":
        # 2. 从 arguments 里取出参数
        length = arguments.get("length", 12)
        include_uppercase = arguments.get("include_uppercase", True)
        include_lowercase = arguments.get("include_lowercase", True)
        include_numbers = arguments.get("include_numbers", True)
        include_symbols = arguments.get("include_symbols", False)

        # 3. 构建字符池
        characters = ""
        if include_uppercase:
            characters += string.ascii_uppercase  # "ABCDEFGHIJKLMNOPQRSTUVWXYZ"
        if include_lowercase:
            characters += string.ascii_lowercase  # "abcdefghijklmnopqrstuvwxyz"
        if include_numbers:
            characters += string.digits  # "0123456789"
        if include_symbols:
            characters += "!@#$%^&*()_+-=[]{}|;:,.<>?"

        # 4. 检查字符池是否为空
        if not characters:
            return [TextContent(
                type="text",
                text="错误:至少需要选择一种字符类型!"
            )]

        # 5. 生成密码
        password = ''.join(random.choice(characters) for _ in range(length))

        # 6. 返回结果
        return [TextContent(
            type="text",
            text=f"生成的密码:{password}\n\n密码长度:{length}\n包含字符:大写={include_uppercase}, 小写={include_lowercase}, 数字={include_numbers}, 特殊字符={include_symbols}"
        )]

    # 7. 如果是未知工具
    return [TextContent(
        type="text",
        text=f"未知工具:{name}"
    )]
1
2
3
4
5
6
7
8
9
10
11
12
13
14
15
16
17
18
19
20
21
22
23
24
25
26
27
28
29
30
31
32
33
34
35
36
37
38
39
40
41
42
43
44
45
46
47
2
3
4
5
6
7
8
9
10
11
12
13
14
15
16
17
18
19
20
21
22
23
24
25
26
27
28
29
30
31
32
33
34
35
36
37
38
39
40
41
42
43
44
45
46
47
这段代码的关键点
- 函数签名
async def call_tool(name: str, arguments: dict) -> list[TextContent]:
1
- name: AI调用的是哪个工具(比如 "generate_password")
- arguments: AI传来的参数(是一个字典)
- 返回值:必须返回 list[TextContent]
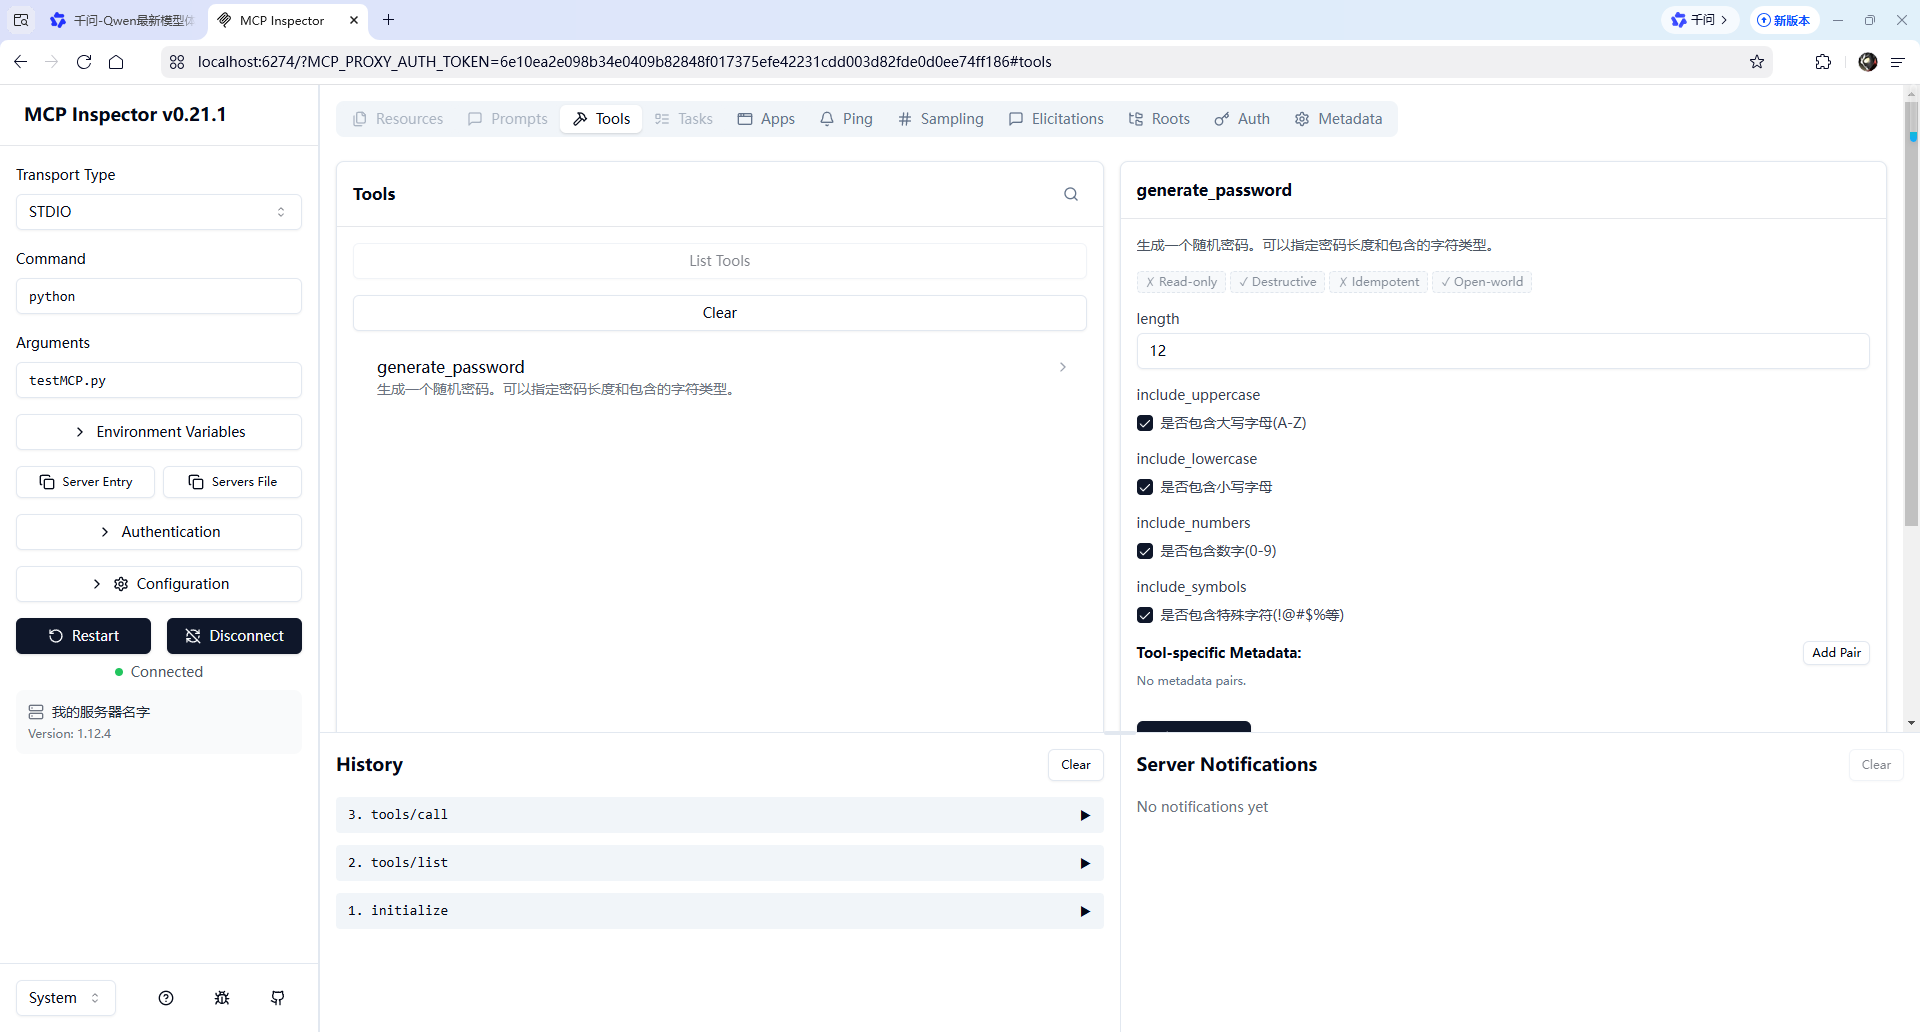
# 第四步,启动Inspector
运行
npx @modelcontextprotocol/inspector python password_generator.py
1
在界面上操作
界面上你能看到:
- Connect 按钮
点击连接你的MCP服务器 - Tools 标签页
这里会列出你定义的所有工具
你应该能看到 generate_password - 点击工具名
会展开显示这个工具的参数
你可以填写参数值,然后点击 "Run" 执行 - 查看结果
执行后会在下方显示返回的内容
为什么一定要返回TextContent
先理解:MCP 不只返回文字
TextContent 只是 MCP 支持的内容类型之一。实际上 MCP 还支持:
TextContent - 文字内容
ImageContent - 图片内容
ResourceContent - 资源引用
所以返回值设计成 list[Content],是为了让你可以返回多种类型的内容。
# 第五步,集成到qwen agent
# 使用fastMCP开发MCP
在实际工作中,我们用上面的方式还是有些繁琐了,一般在工作中使用fastMCP来开发
我们来重写代码
#!/usr/bin/env python3
"""
密码生成器 MCP Server(FastMCP 版)
"""

import random
import string
from mcp.server.fastmcp import FastMCP

# 创建 MCP 服务器实例
mcp = FastMCP("password-generator")


# ============================================
# 工具1:生成密码
# ============================================
@mcp.tool()
def generate_password(
    length: int = 12,
    include_uppercase: bool = True,
    include_lowercase: bool = True,
    include_numbers: bool = True,
    include_symbols: bool = False
) -> str:
    """生成一个随机密码,可以指定密码长度和包含的字符类型

    Args:
        length: 密码长度,默认12位
        include_uppercase: 是否包含大写字母(A-Z)
        include_lowercase: 是否包含小写字母
        include_numbers: 是否包含数字(0-9)
        include_symbols: 是否包含特殊字符(!@#$%等)

    Returns:
        生成的密码信息
    """

    # 构建字符池
    characters = ""
    if include_uppercase:
        characters += string.ascii_uppercase
    if include_lowercase:
        characters += string.ascii_lowercase
    if include_numbers:
        characters += string.digits
    if include_symbols:
        characters += "!@#$%^&*()_+-=[]{}|;:,.<>?"

    # 检查字符池
    if not characters:
        return "错误:至少需要选择一种字符类型!"

    # 生成密码
    password = ''.join(random.choice(characters) for _ in range(length))

    return f"""生成的密码:{password}

长度:{length}位
包含:大写={include_uppercase}, 小写={include_lowercase}, 数字={include_numbers}, 特殊字符={include_symbols}"""


# ============================================
# 工具2:检查密码强度
# ============================================
@mcp.tool()
def check_password_strength(password: str) -> str:
    """检查密码的强度,返回评分和改进建议

    Args:
        password: 要检查的密码

    Returns:
        密码强度评分和建议
    """

    if not password:
        return "错误:请提供要检查的密码"

    # 计算强度
    score = 0
    feedback = []

    # 检查长度
    if len(password) >= 8:
        score += 25
    else:
        feedback.append("密码长度应至少8位")

    # 检查大写字母
    if any(c.isupper() for c in password):
        score += 20
    else:
        feedback.append("建议包含大写字母")

    # 检查小写字母
    if any(c.islower() for c in password):
        score += 20
    else:
        feedback.append("建议包含小写字母")

    # 检查数字
    if any(c.isdigit() for c in password):
        score += 20
    else:
        feedback.append("建议包含数字")

    # 检查特殊字符
    special_chars = "!@#$%^&*()_+-=[]{}|;:,.<>?"
    if any(c in special_chars for c in password):
        score += 15
    else:
        feedback.append("建议包含特殊字符")

    # 确定等级
    if score >= 80:
        level = "非常强 💪"
    elif score >= 60:
        level = "较强 👍"
    elif score >= 40:
        level = "一般 😐"
    else:
        level = "较弱 ⚠️"

    # 构建返回
    result = f"""密码强度检查结果

密码:{'*' * len(password)}
强度评分:{score}/100
等级:{level}"""

    if feedback:
        result += "\n\n改进建议:\n"
        for tip in feedback:
            result += f"  - {tip}\n"

    return result


# ============================================
# 启动服务器
# ============================================
if __name__ == "__main__":
    mcp.run()
1
2
3
4
5
6
7
8
9
10
11
12
13
14
15
16
17
18
19
20
21
22
23
24
25
26
27
28
29
30
31
32
33
34
35
36
37
38
39
40
41
42
43
44
45
46
47
48
49
50
51
52
53
54
55
56
57
58
59
60
61
62
63
64
65
66
67
68
69
70
71
72
73
74
75
76
77
78
79
80
81
82
83
84
85
86
87
88
89
90
91
92
93
94
95
96
97
98
99
100
101
102
103
104
105
106
107
108
109
110
111
112
113
114
115
116
117
118
119
120
121
122
123
124
125
126
127
128
129
130
131
132
133
134
135
136
137
138
139
140
141
142
143
# 关键变化
- 导入不同了
# 之前
from mcp.server import Server
from mcp.types import Tool, TextContent

# 现在
from mcp.server.fastmcp import FastMCP
1
2
3
4
5
6
2
3
4
5
6
- 实例化不同了
# 之前
server = Server("password-generator")

# 现在
mcp = FastMCP("password-generator")
1
2
3
4
5
2
3
4
5
- 定义超级简洁
# 之前:要写两个装饰器 + JSON Schema + if-elif
@server.list_tools()
async def list_tools() -> list[Tool]:
    return [Tool(name="generate_password", ...)]

@server.call_tool()
async def call_tool(name: str, arguments: dict):
    if name == "generate_password":
        ...

# 现在:一个装饰器搞定
@mcp.tool()
def generate_password(length: int = 12) -> str:
    """描述直接写这里"""
    return "结果"
1
2
3
4
5
6
7
8
9
10
11
12
13
14
15
2
3
4
5
6
7
8
9
10
11
12
13
14
15
- 启动更简单
# 之前
async def main():
    async with stdio_server() as (read, write):
        await server.run(read, write, ...)

asyncio.run(main())

# 现在
mcp.run()
1
2
3
4
5
6
7
8
9
2
3
4
5
6
7
8
9